Tuesday, January 1, 2013

Frankentoys: satisfying a destructive dog without constant new toys

We have a very playful dog who enjoys destroying toys. But it's not very "green" to keep buying new toys and throwing them out. Fortunately, Sarah has come up with an excellent solution which involved combining scraps of old toys together into new toys which the dog considers fun and exciting again. You will need the following:
1. A few old toys which your dog has extracted the stuffing from and grown bored with
2. An old chewed up rope toy (we used a rope lobster)
3. A happy dog

For our latest toy surgery, we began with a new large monkey toy Leeta got as an early Christmas present, which was extremely popular:
Leeta eating monkey brains

She loved the toy, and had great fun playing with it for a few days before we ended up in this situation:
Deconstructed Monkey

Note the shell of the monkey, as well as several other old toys in the area. To proceed, take the shell of the toy, and restuff it with other toy shells. Tennis balls, spare squeakers, and the old stuffing also make excellent things to restuff the toy with. The less ripped the shell is, the easier this will be. If only one end of a long tubular toy is ripped you can just restuff it and call it a day, but since this monkey was quite ripped up, I had to cut off several strands from the rope toy and use them to tie the new toy together so it would stay intact. And behold, a fun new frankentoy is ready to be rediscovered by your dog! Leeta enjoying frankenmonkey

We can generally get away with recombining old toys several times before she gets truly bored with them. Not every combination works, the most effective strategy seems to be a mix of a toy she still plays with regularly, and some old toys she has forgotten about (which may be interesting again). It's also key for her to have to work at it to be able to extract the new stuffing, although she still enjoys shaking them around and chasing them even before she settles down to redestroy them. There are some toys you can get that are designed to have parts removed and restuffed which we also like (http://www.amazon.com/Kyjen-Babies-Original-Series-Platypus/dp/B0009YHTA6), but this is a great way to reuse all of the normal toys you may get.

Thursday, December 20, 2012

Garlic Extract

I get kind of crazy about high-quality hardneck garlic at the farmer's market. It has a strong, rich flavor, and a thick, oily texture that I find entirely different from normal garlic. Our local Whole Foods usually only has extra-gross garlic with that odd baloney smell old garlic often gets. To be able to taste quality garlic in the off season, I decided to start making my own garlic extract (which also makes cooking a lot more convenient).

First, while this picture isn't great, you can see the difference in how much garlic oil there is between the good garlic (at left) and the normal garlic (at right):

Garlic juice on knife

Anyway, to capture that goodness, just chop up a ton of good garlic, and let it soak in some decent vodka. No need for top-shelf, but please don't use gross super-cheap vodka which has off flavors. Svedka has the best quality: price ratio in my opinion, so it's what I used. Here's the vodka soaking up the garlic flavor:


Garlic vodka / extract

After it tastes sufficiently garlicky (I gave it 2 days in the fridge), strain through a cheesecloth. Now you can just add a splash of it to your stir fry, and it will taste like fresh garlic! Wayyy better that garlic powder.

Garlic vodka

Sunday, December 9, 2012

Vegan Cheese (and wine) Party

When we saw the post about tofu misozuke on recipe renovator, we knew we had to try it. Then VegNews came out with a special issue about making aged vegan cheeses (using new recipes from Miyoko Schinner's new book: Artisan Vegan Cheese), so we figured it was time for a wine and vegan "cheese" party:
Wine & Vegan Cheese Party

Naturally, I wanted to collect data on how tasty and "cheesy" each of our creations were (and look for differences between vegans and non-vegans). Since that data was too interesting to skim over, I posted the full results with some intriguing charts and graphs over on my other blog (Science Jon). For this post, I'm just providing an overview of the homemade cheeses.

Tofu Misozuke
Tofu Misozuke (four flavors)
This was some interesting stuff. As detailed in recipe renovator, these take a while. We aged them for two months to get as creamy a texture as possible. We followed the precise directions for the nori, plain, and red pepper misozuke, but we really wanted to do garlic as well. Since garlic is supposed to be an antibiotic, we were worried it might interfere with the process, but it worked well. We added about 1 tsp of garlic powder and 1 Tbsp garlic vodka / garlic extract (stay tuned for more info on this stuff) to the basic plain marinade. The clear favorite was the garlic, followed by pepper, followed by nori, with plain the least popular flavor. To me most of them had kind of an alcohol flavor which was off putting, and overall these were much less popular than the homemade aged cheeses (see below). But the texture was fantastic.

The next three cheeses were all made with cashews and rejuvelac from Miyoko Schinner's recipes.

Goat Cheese (Chรจvre) with Herbs de Provence
Vegan Goat Cheese w/ Herbes de Provence
This was the clear favorite at the party (although vegan lady herself hated it). On a scale from 1 to 9 it got a 7.9 on flavor (even with Sarah's rating of 2 included) and 7.4 / 9 on cheesiness. It took about four days total, and had a great creamy texture, with a nice mild flavor with just enough bite. The herbs were a great touch too. We did 48 hours of aging for the first step, then 48 more hours after all of the other ingredients were added. As a final note, our rejuvelac didn't arrive in time for this one, so we ended up using some vegan probiotic liquid / kefir instead for the first round(which had less of a cheesy flavor). We did add some rejuvelac when we added the final ingredients.

Sharp Cheddar
 Vegan Sharp Cheddar Spread
This was a close second for favorite cheese at the party, and definitely had the most authentic "cheesy" flavor I've ever had in vegan cheese (thanks to the secret ingredient, rejuvelac). I'm not clear why this never firmed up like it should, but it worked well as a spread too (not a "cheesy" texture, but great flavor). We did soak the cashews for almost two days rather than 3 hours since we wanted a smoother texture, so maybe they absorbed too much water? We went with the full 72 hours of aging to develop plenty of flavor, then another 24 hours in the fridge. The mean flavor rating was 7.7/9, and it got a 5.4/9 for cheesiness (mostly b/c of the texture).

Buffalo Mozzarella
 Vegan Buffalo Mozzarella
The nonvegans who knew what fresh mozzarella was like were especially impressed with the texture of this one. It doesn't taste like much (it's not really supposed to), and the texture was soft and creamy. I found it boring on crackers, but the leftovers did work well on vegan pepperoni pizza. It got 6 on flavor, and 5.7 on cheesiness. This recipe started with straining 2 cups of soy yogurt to yield a 1 cup of much thicker yogurt. But when we checked our cheesecloth-lined colander in the morning, none of the liquid has strained out. So instead,  we added an extra 1/2 Tbsp of tapioca flour and 1/4 tsp of agar powder to 1 cup of normal (non-drained) yogurt. Everything else went according to plan (we used 24 hours of aging).

We also sampled Daiya Cheddar wedge, Dr. Cow w/ Blue-Green Algae, Galaxy Cream Cheese, Tofutti Ricotta (we served it cold, but apparently when heated it melts and becomes way better), and Wayfare Hickory Cheddar. We also had Vegan Queso (from Food for Lovers), Sheese Cream Cheese, and Tofutti Cream Cheese, but since those three were unplanned they weren't on the data sheet and not many people submitted ratings for them.

Overall, we decided that the misozuke was too much work and not good enough to make again. If you think of it as a pate rather than a cheese it's better. The other three aged cheeses were all easy enough and tasty enough to make again, especially the cheddar and the goat cheese (although again, Sarah really didn't like the goat cheese). The commercial cheeses by comparison were pretty disappointing overall, but there was huge variety in which cheeses each person loved and hated.

Monday, November 12, 2012

Trash into treasure: homemade vegetable stock from scraps

Vegetable stock is delicious, but it's expensive to buy and a pain to make. The idea of keeping vegetable scraps to make it from (saving hassle and expense) is an old one, but the scraps always spoiled before I had enough to make a balanced broth. But a few years ago, a friend of ours mentioned that he just keeps the scraps in the freezer until he has enough. Brilliant! We now keep a large tub in the freezer and wait until it's full to make vegetable stock. Using a pressure cooker it only takes about 35 minutes or so to cook (we cook it for 25 minutes on high after it's up to pressure).

Here's what it looks like before cooking:
Vegetable stock

In this batch we had leek greens, parsnip and carrot peels, red and yellow tomato ends, mushroom stems, and garlic ends. Other times we put in celery leaves, sweet potato or butternut squash peels, sometimes even kale stems for health (although inexplicably our dog loves kale stems, so she usually gets those now). Things that are slightly blemished are fine to go in (you'll filter out the solids anyway) even if you wouldn't put them in soup. Just nothing that has spoiled. Also, don't put too much onion / garlic or they can dominate the flavor.

Directions:
dump the big bowl of frozen scraps into a pressure cooker
If you don't plan to compost it in a worm bin afterwards, add some salt (maybe 1/2 tsp) which will help to pull the flavors out
cook on high 25 minutes
strain out into a big glass bowl, use some in a recipe right away if you like (or put in the fridge if you'll use it within a few days). Break the rest up into 2 cup increments and store in the freezer for whenever you need some vegetable stock

We make ours salt-free because afterwards the cooked scraps go into our worm bin. So we get remarkably good fresh veggie broth for free (and by freezing it, we always have some available), and nothing gets wasted since it all gets composted in the end and was just scraps that we wouldn't use otherwise anyway! This is truly one of our favorite kitchen tricks.

What has vegan lady eaten lately?

Vegan lady finds herself too busy to write here more often than not now that she's back in grad school, and I can't keep up with all of the great stuff we eat on my own. So here's a quick sampling of some of what we've been eating lately. Sorry there are no recipes, but leave a comment if you want one and we'll see what we can do.


Seitan braised in red wine mushroom sauce (incredible): Seitan braised in red wine mushroom sauce

with some kale added for health: Kale and seitan in red wine mushroom sauce

tempeh tacos w/ Mexican slaw (the tempeh used the marinade recipe from "fajitas" on http://food.veganjon.com): Tempeh tacos with Mexican slaw

Simple Thai salad (nothing fancy, just a way to use up some leftover peanut-coconut dipping sauce from our spring rolls): Simple Thai salad

Roasted cardoon, jerusalem artichoke, and parsnip: Roasted Cardoon, Jerusalem Artichoke, and Parsnip

If you have never heard of cardoon before (we hadn't), it's a relative of the artichoke which looks like celery but tastes like a bitter artichoke: Cardoon

Raw parsnip beet salad with pineapple-mint dressing: Parsnip-beet salad with pineapple mint dressing

Bonus points for making the salad with striped Chioggia beets: Striped Chioggia beets

But still good if you make it with normal beets (we liked it enough to make it twice): Raw beet parsnip salad

and finally, pumpkin parsnip kale lasagna (with parsnips FINALLY at the farmer's market, I just can't help myself): Pumpkin parsnip kale lasagna

A simple three-course Thai meal: Tom Yum, Thai Spring Rolls, Coconut Rice w/ Mango

We recently saw some fresh galangal (looks like ginger, but has a different, sort of flowery odor) at the farmer's market  and were inspired to make a Thai meal. Ever since I had a bowl of mind-blowing tom yum in Hawaii I have been wanting to try and recreate it.

Once we'd decided to do that, why not Thai spring rolls and mango coconut rice?

Thai spring rolls Coconut sticky rice with mango
In planning the soup, I thought back to that eye-opening bowl I'd had on our  honeymoon. The key difference from most tom yum I'd had was the strength and simplicity of the flavors; the flavors of the large inedible chunks of lemongrass, galangal, and kaffir lime leaves in the soup blended together and made it clear that this soup meant business. Anyway, I didn't want our guests to have to pick out inedible chunks, but I still wanted to focus on the flavor of the broth because the typical ingredients to vegetarian tom yum (tomatoes, canned straw mushrooms, tofu) were uninspiring. As a result, I just filtered everything out and served it as a plain broth. Now that I've verified how good the broth is, I'm going to try again with a few solid ingredients and see what happens. Here's the recipe I came up with:
In a saucepan, add:
4 cups vegetable stock
~1/4 cup lime juice (I used 1.5 limes)
2 Tbsp sugar
2 stalks lemongrass (remove the outermost dirty layer, and score the entire length of it with a knife)
~1/3 cup chopped fresh galangal
8 kaffir lime leaves
2 tsp chili oil (I used sesame chili oil, but that was a mistake. plain chili oil or canola would be better)
1 fresh cayenne pepper, minced (or other hot pepper)
garlic (maybe 2 cloves? I used a big splash of homemade garlic vodka / garlic extract)
2 pickled umeboshi plums, pitted (these provide a nice salty pungent umami flavor in place of fish sauce)
maybe 1/2 cup cilantro probably would be good, we just didn't have any

Heat the saucepan on high, and once boiling reduce to simmer and cook for about 20-30 minutes until delicious. Add salt to taste if needed. Strain out the broth so you won't have to pick out the inedible bits (lime leaves and lemongrass) You could make this with enoki mushrooms, or straw mushrooms if you don't hate them, or tomatoes (I guess), or tofu.

For the spring rolls (what I call non-fried rice paper rolls, some other people call them "fresh rolls" or "summer rolls"), we started by freestyling a coconut-lime-peanut sauce (sorry, I didn't keep track of what went in but it was tasty). Next we sauteed up some homemade seitan with garlic / soy / mirin / galangal, and minced it in the food processor. We shredded some carrots, thinly sliced the fresh red peppers which we can STILL get at the farmer's market in late November (good enough to eat like an apple), and washed and chopped the arugula. We got a good factory assembly going where I softened up the rice wrappers (since I have heat-resistant hands) and passed them to Sarah to stuff and fill.

Sadly our rice was not all it could have been. We basically used the coconut rice recipe from Joy of Cooking (which is good), but instead of jasmine rice (as they recommend), or sticky rice (which is best), we used some leftover arborio rice we had from a friend who just moved, plus a bit of jasmine rice for flavor. Tragically the only mango at Whole Foods was overripe on one end, and under-ripe on the other, but we got enough mango out of it to at least give our dinner guests a good mix of mango and coconut rice. The leftover rice got dry in the fridge overnight, but was excellent with some So Delicious vegan nog on it and then microwaved until it was soft.

Saturday, October 27, 2012

Gingerbread Vodka

I've come up with a lot of recipes in my life, but this is probably the one I'm the proudest of. The idea came about on a trip to Urbana in 2007, and after perfecting it it's been a holiday staple ever since. It's fairly simple to make, here's how.

Ingredients:
700 mL vodka + 240 mL dark rum*
2 long strips lemon zest (from end to end)
2 cinnamon sticks
10 cloves
1/4 cup minced ginger (1-2 inches)
2 tsp vanilla
3 Tbsp blackstrap molasses

*You may want to use extra vodka in each of the three infusions, both because it lets you tweak the flavor balance better, and because it's always nice to have extra of the component vodkas (e.g. the cinnamon-clove vodka is good in apple cider). I like using Svedka which has a great ratio of quality to price. Using a good dark rum (e.g. Barbancourt) instead of vodka for the 250 mL that gets infused with cinnamon-cloves will taste even better, but it's harder to tell when the infusion is done using color as a guide, since it doesn't start clear. So you'll have to taste it more often.

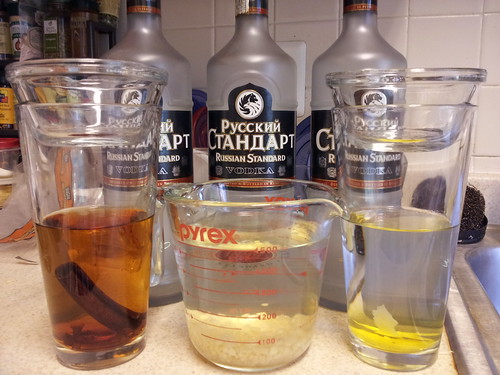
Pour the vodka into two containers: one with 450 mL of vodka, and 250 mL of vodka in another, and 240 mL rum in the third. You ideally have at least 50mL extra of each so you can adjust the flavor balance at the end.  Add the ginger to the 450 mL of vodka, the lemon to the 250 mL of vodka, and the cinnamon and cloves to the 240 mL of rum. Cover and let them sit at room temperature. The lemon needs at least 2 days to be good, but it's OK if it sits longer. The cinnamon-clove is usually ideal after about 3 days, and the ginger sometimes takes longer depending on how strong your ginger is (4-5 days) - use more ginger if you need it to be ready faster! Basically taste each one and make sure you think it has enough flavor.

Here's what it looks like after 3-4 days if using vodka in all three (I started the ginger one day early, and lemon one day late):
Gingerbread vodka, step 1

Using a strainer or cheesecloth, pour most (but not all) of each vodka into the original bottle and mix well. Taste it, and decide if you think it needs more of any of the three components (if so, add them). If you like it as is, add the rest of the vodka. Sometimes one component ends up too strong, so it's nice to be able to balance it at the end. Here's what it looks like after you've mixed the three infusions before adding molasses and vanilla:
Gingerbread vodka, step 2

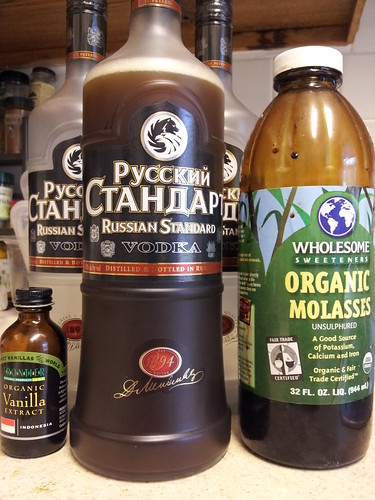
Finally, add 1 Tbsp vanilla and 3 Tbsp blackstrap molasses (or more or less of each according to taste) into the bottle through a funnel. Shake very well, until no traces of molasses are visible on the bottom of the bottle or the neck (the two places where it tends to accumulate). Taste and decide if you think it needs more of anything else. If you like sweet liquor, you may want to add more molasses or even some brown sugar. Here's what the finished product looks like:
Gingerbread vodka, step 3 (final)

It is good straight or on the rocks, but just ludicrously delicious in soy nog (I like Silk Nog best). It cuts the inevitable harshness (even though Russian Standard is quite mellow, it's still vodka) and the creamy base allows the flavor to blossom in a way that never fails to surprise and delight me. If you can't get vegan nog due to the season, unsweetened vegan creamer, or a mix of vegan milk and melted vegan ice cream can be OK in a pinch. Let me know how it works for you in the comments! I've made many many liters over the years and people still go nuts for it every time. In fact, this year for Halloween I'm going as the gingerbread man and will have a bottle of this (and a sack of ginger snaps) to share with the world.