- Quickly aerating red wine so you can drink it without waiting around for it to open up in a decanter.
- Breaking up all the lumps in matcha without resorting to your thumb after a normal whisk proves insufficient.
- Making a flaxseed egg replacer - the whisking helps it get nice and thick.
- Hot chocolate - first breaking up the lumps with a it of hot nondairy milk, then frothing the top once it's all mixed
Friday, June 7, 2019
Milk frothers are an underappreciated tool
Little battery-powered milk frothers are super useful, and underappreciated. Our top uses:

Sunday, May 26, 2019
Oat milks: the new class
After the infamous Oatly shortage of 2018, it seemed like there was a huge untapped market for oat milk. As a result several companies scrambled to put together a product, and by spring 2019 there were quite a few competitors vying for that demand.
Sarah did not like Oatly; she found it too sweet. I thought it was OK, but not really worth buying. But when Sarah's mom bought some of the Silk oat milk and we liked it, we knew it was time for an oat-off (all with unsweetened varieties):

Here's the verdict:
Quaker Oat Beverage:
Last place. The first problem is that it settles out to such a degree that you'd need one of those paint shaker machines to get it mixed up properly. Otherwise you shake it hard for about a minute and there's still a bunch of gunk on the bottom. Then you drink whatever you've got, and it's super chalky and thick (like eggnog almost). Has a nice mild oat flavor, but it's not a good drink. Note the avoidance of the term "milk" on the label - probably wise given all the lawsuits and rules changes in Europe and the US.
Silk Oat Yeah Oatmilk:
This was the one that Sarah really liked initially. It's thinner than Quaker (still thicker than normal soy or almond milk), has a stronger oat flavor, and is somewhat sweeter. Surprisingly didn't really work with hot chocolate, despite the sweetness. Still tasty and worth drinking.
Plant Oat Oatmilk:
This was the dark horse. It's a company we'd never heard of, and it was a full dollar less than the other options. To our surprise, this was the winner; originally Sarah didn't even want to try anything other than Silk but w/ a blind tasting she preferred this one. It's got a pretty mild oat flavor, was the thinnest of the bunch (more like normal plant milk), and has its own flavor somehow a little bit reminiscent of cow's milk (which I don't like, but was OK here). Unfortunately, it had the lowest vitamin content, and since Sarah relies on her plant milk for calcium that was a real downside.
So Sarah's back to drinking Bolthouse Farms unsweetened pea milk, and I'm back to drinking water.
Sarah did not like Oatly; she found it too sweet. I thought it was OK, but not really worth buying. But when Sarah's mom bought some of the Silk oat milk and we liked it, we knew it was time for an oat-off (all with unsweetened varieties):
Here's the verdict:
Quaker Oat Beverage:
Last place. The first problem is that it settles out to such a degree that you'd need one of those paint shaker machines to get it mixed up properly. Otherwise you shake it hard for about a minute and there's still a bunch of gunk on the bottom. Then you drink whatever you've got, and it's super chalky and thick (like eggnog almost). Has a nice mild oat flavor, but it's not a good drink. Note the avoidance of the term "milk" on the label - probably wise given all the lawsuits and rules changes in Europe and the US.
Silk Oat Yeah Oatmilk:
This was the one that Sarah really liked initially. It's thinner than Quaker (still thicker than normal soy or almond milk), has a stronger oat flavor, and is somewhat sweeter. Surprisingly didn't really work with hot chocolate, despite the sweetness. Still tasty and worth drinking.
Plant Oat Oatmilk:
This was the dark horse. It's a company we'd never heard of, and it was a full dollar less than the other options. To our surprise, this was the winner; originally Sarah didn't even want to try anything other than Silk but w/ a blind tasting she preferred this one. It's got a pretty mild oat flavor, was the thinnest of the bunch (more like normal plant milk), and has its own flavor somehow a little bit reminiscent of cow's milk (which I don't like, but was OK here). Unfortunately, it had the lowest vitamin content, and since Sarah relies on her plant milk for calcium that was a real downside.
So Sarah's back to drinking Bolthouse Farms unsweetened pea milk, and I'm back to drinking water.
Monday, May 28, 2018
Review: The Fancy Radish
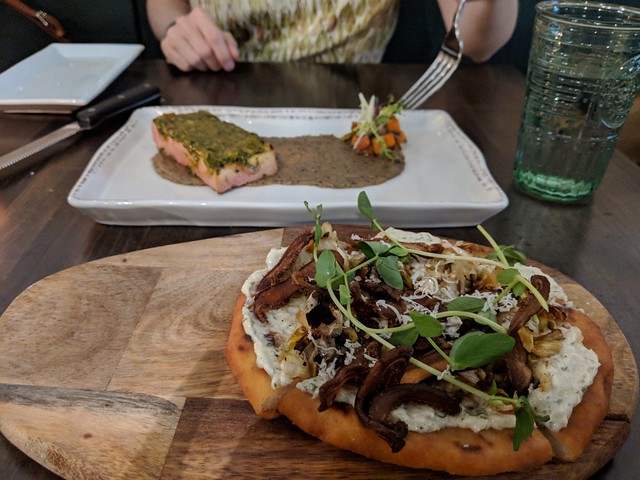
The Fancy Radish is the new upscale vegan restaurant in DC from Richard Landau and Kate Jacoby of Philly fame. After two visits, Vegan Lady and I are ready to share our review.
Though pricey and hard to get reservations, it's definitely worth it. They are clearly still working out a few kinks from some dishes, but others are spot on. Here's the blow-by-blow, but if you just want to know what we recommend you order, look for the 👌 symbol:
APPETIZERS AND MAIN COURSES:
Rutabaga fondue w/ soft pretzel: 👌
Damn. This is really phenomenal. The texture is velvety and fondue-like, but the taste is neither real cheese nor vegan fake-cheese, but it's own (delicious) thing. There's a bit of nutritional yeast in the flavor but not too much. And the pretzel is amazing - fluffy and soft inside, with an outside that's almost crisp. The fresh mixed pickles (cauliflower, carrot,etc.) are good too, but not key to the beauty of the pretzel and fondue.
Fancy radishes:
This was fine, but not worth the opportunity cost of something else on the menu. There were four kinds of radishes (black, 'purple ninja', watermelon, and a fourth I forget) each of which paired with 1-2 other flavors (like shisito peppers, or shredded zucchini with sesame seeds, etc.). Of the lot, they were all good, but only one was great.
Chiogga beet picnic:
This was really nice, better than expected. It's beets with a BBQ-ranch theme, including brussel sprout slaw and lovely little toast points. It tastes like something you could make at home, but done very well.
Peruvian potatoes:
This was the only real dud we had. The potatoes are thinly sliced, really oily, and crazy salty (although we had this after they'd only been open a week or two, maybe they fixed it). The other flavors were good but in short supply - mostly you just got the salty potato flavor.
Langos👌
This was just incredible through and through (it's the bottom dish in the image above). Again the skill of the baker shines through in the soft and light yet slightly crispy potato bread in the form of a pizza crust, and it's topped with leek 'sauerkraut ' (which is creamy rather than vinegary), fried smoky mushrooms with the spot-on texture of fried bacon, and little shreds of horseradish. It is salty and very strongly flavored, but those flavors are all the best. You could honestly eat this on top of pasta or a slice of bread and still be in good shape.
Miso butter noodles:
Other than the Peruvian potatoes, this was also fairly disappointing. The noodles are oily but really mild - you get the nori and not much else. If you like really subtle flavors this may be a good pick but otherwise save your appetite for the more tempting options.
Chermoula grilled tofu:
This was really good, although it came at the same time as the langos so it suffered by comparison. Basically you have nicely done tofu w/ North African eggplant sauce, and a tiny carrot salad that provides a really great flavor combination but in too small a quantity to round out the dish as we would have preferred. With maybe double the salad this would have been a keeper.
Seared maitake:👌
This was our favorite 'main course' although the second time it wasn't quite as good. You get a good chunk of maitake mushrooom (hen of the woods) seared in olive oil, a celeriac fritter (like a hush puppy) with some minced celery 'relish' and creamy celery sauce. Everything tastes wonderful and works really well together - this dish highlights the concept of Vedge and Fancy Radish really well (letting vegetable foods shine). The second time we came the dish was a bit too salty, and the fritter slightly mushy, but it was still great.
DESSERT:
Sticky toffee pudding:
This is off the menu now - it had a great flavor but was wayyy too sweet. It was like a butterscotch brownie with caramel sauce, and was supposed to come with smoked cedar ice cream but actually came with halwa ice cream, although the waiter insisted it was cedar our taste buds were in accord so they must have run out).
This is off the menu now - it had a great flavor but was wayyy too sweet. It was like a butterscotch brownie with caramel sauce, and was supposed to come with smoked cedar ice cream but actually came with halwa ice cream, although the waiter insisted it was cedar our taste buds were in accord so they must have run out).
Sorbets and ice creams:
We got a mix of three - uber luxe (deep rich chocolate with crispy bits, pea shoot ice cream, and I forget the third but it may have been yuzu sorbet). All were good, but none were totally mind-blowing, so given the other desserts I'd skip this next time.
We got a mix of three - uber luxe (deep rich chocolate with crispy bits, pea shoot ice cream, and I forget the third but it may have been yuzu sorbet). All were good, but none were totally mind-blowing, so given the other desserts I'd skip this next time.
Sour cherry jellies:👌
This sounded like it couldn't possibly work: sumac jelly doughnuts, halwa ice cream, and a cherry blossom shooter. But it was a real delight. The 'doughnuts' were really more like beignets on a cherry-sumac sauce, but they had a great texture and flavor. The halwa ice cream tasted like you'd expect and complemented the sumac and fried dough really well. The cherry blossom shooter was some sort of kombucha or something - light and acidic and also worked with the rest of the dessert. Sarah found the overall dish too sweet, however.
This sounded like it couldn't possibly work: sumac jelly doughnuts, halwa ice cream, and a cherry blossom shooter. But it was a real delight. The 'doughnuts' were really more like beignets on a cherry-sumac sauce, but they had a great texture and flavor. The halwa ice cream tasted like you'd expect and complemented the sumac and fried dough really well. The cherry blossom shooter was some sort of kombucha or something - light and acidic and also worked with the rest of the dessert. Sarah found the overall dish too sweet, however.
Chocolate bar:
Basically a dense chocolate fudge on a crispy chocolate brownie / cookie crust, topped with elderflower-infused pecans and served with lavender ice cream and blackberries. It was rich, decadent, and the floral flavors kept you a bit off balance but I ended up licking my plate clean. Sarah has less tolerance for floral flavors in her food so liked the main bar but not the ice cream.
Blueberry tart:
OK, the tart had a bottom crust almost an inch thick, which was a shame, because everything else was superb - the blueberry filling, the sorrel ice cream, and the lemon curd. But there was way too much crust, and the texture on the bottom suffered for the thickness.
OK, the tart had a bottom crust almost an inch thick, which was a shame, because everything else was superb - the blueberry filling, the sorrel ice cream, and the lemon curd. But there was way too much crust, and the texture on the bottom suffered for the thickness.
DRINKS:
Peridot meteor:👌
Made with gin, celery, hot bitters, and olive oil this sounded gross but too weird to miss but ended up being a very pleasant surprise. The bitter celery flavors were dialed back, something sweet was in there to round it out, the oil was also pretty light, and it all blended really well.
Woodmaze:
This is an earthy-smoky party made with bourbon, pu'erh tea (a very earthy and smoky high-grade fermented Chinese tea), and Manzanilla sherry. It was complex and tasty, but to be totally honest the flavors didn't go that well with the meal so would be better as an after-dinner cocktail.
Raphanus shade:
Another one I had to order for the sake of weirdness - it's rye with black vinegar, a slice of raw black radish, and Amaro Ferro-Kina (an Italian apertif). The vinegar really comes through on the nose - as I lifted it to my lips I definitely had regret as it seemed like I was doing a kimchi shot. The flavor was more mild and well balanced than I expected, I ended up enjoying it enough to finish it, but definitely wouldn't order again as for me to vinegar was just too much.
Made with gin, celery, hot bitters, and olive oil this sounded gross but too weird to miss but ended up being a very pleasant surprise. The bitter celery flavors were dialed back, something sweet was in there to round it out, the oil was also pretty light, and it all blended really well.
Woodmaze:
This is an earthy-smoky party made with bourbon, pu'erh tea (a very earthy and smoky high-grade fermented Chinese tea), and Manzanilla sherry. It was complex and tasty, but to be totally honest the flavors didn't go that well with the meal so would be better as an after-dinner cocktail.
Raphanus shade:
Another one I had to order for the sake of weirdness - it's rye with black vinegar, a slice of raw black radish, and Amaro Ferro-Kina (an Italian apertif). The vinegar really comes through on the nose - as I lifted it to my lips I definitely had regret as it seemed like I was doing a kimchi shot. The flavor was more mild and well balanced than I expected, I ended up enjoying it enough to finish it, but definitely wouldn't order again as for me to vinegar was just too much.
Saturday, January 27, 2018
Thai pizza (or Caribbean jerk pizza) with coconut crust
I've been making both Thai pizza and Caribbean jerk pizza (with tropical mango / pineapple salsa) for about 20 years, and it finally hit me: why not a coconut pizza crust!
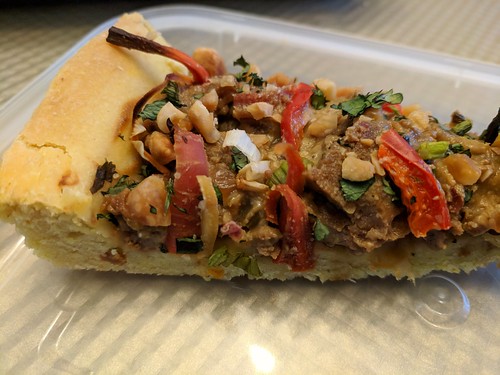
So the recipe for both Thai pizza and Caribbean jerk pizza is available at http://food.sciencejon.com
http://food.sciencejon.com
The only thing you need to change is to substitute 1/4 cup melted coconut oil for the 1/4 olive oil. The flavor is really lovely, and it's a bit more flaky and tender than normal pizza crust. In the Thai pizza above I also added some powdered galangal, ginger, turmeric, and lemongrass.
Next time I make the Caribbean pizza I'll try the coconut crust and add a photo here.
So the recipe for both Thai pizza and Caribbean jerk pizza is available at http://food.sciencejon.com
http://food.sciencejon.com
The only thing you need to change is to substitute 1/4 cup melted coconut oil for the 1/4 olive oil. The flavor is really lovely, and it's a bit more flaky and tender than normal pizza crust. In the Thai pizza above I also added some powdered galangal, ginger, turmeric, and lemongrass.
Next time I make the Caribbean pizza I'll try the coconut crust and add a photo here.
Sunday, October 1, 2017
Kitchen hacks that make cooking easier and waste less food
Kitchen hack #1: Plan your meals
When I found out my husband (then boyfriend) only bought food that he had a specific plan to use in the next week, I thought, who lives that way? What a restrictive and hard way to live! I believed I could never live like that - that the advance planning would take the fun and spontaneity out of life.
I can report that, 11 years later, cooking and life is actually just as enjoyable when you plan your meals in advance. Surprise! As a bonus, we waste a lot less food and eat a more balanced diet.
Each week we look through cookbooks for recipes we're interested in and add the ingredients we need to the groceries list in the app Our Groceries. We have a separate list called "meals this week", where we list the recipe name, the cookbook abbreviation, and the recipe page number. We plan everything down to the exact number of onions we'll need for that week. Why can I do this but am unable to get birthday cards mailed on time? A good question.
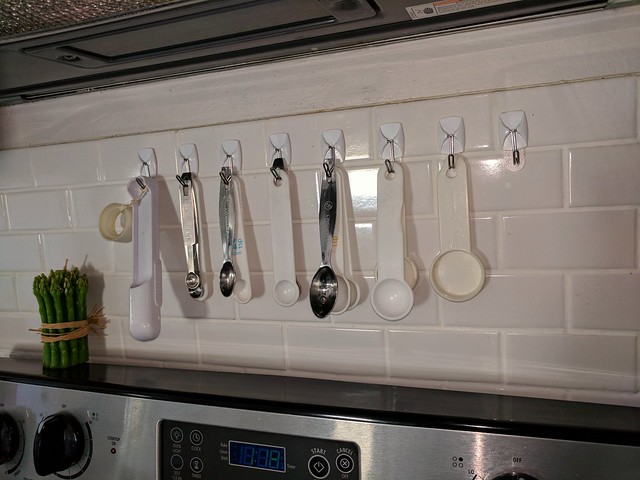
Kitchen hack #2: Hang your measuring spoons
If you're tired of sifting around in a drawer for the right size measuring spoon, get yourself some inexpensive command hooks and hang them all up!
Kitchen hack #3: Onion Goggles
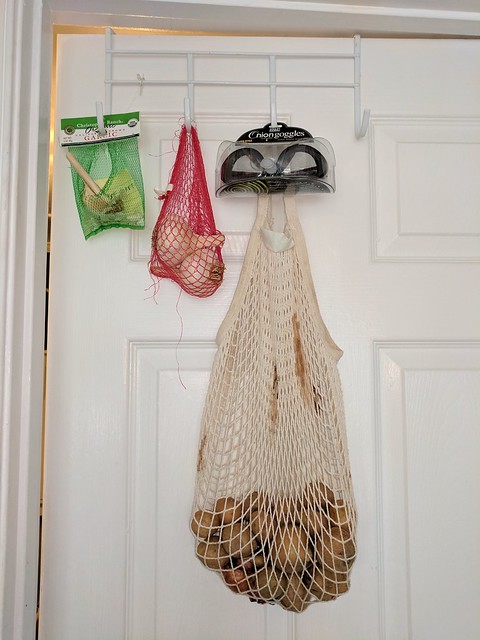
I have super sensitive eyes, so when either I, or anyone near me chops an onion, it hurts. I bought these onion goggles years ago, which have a seal around your face to prevent the fumes of the onion from reaching your eyes. They still work perfectly. I love them.
I'd also like to note the 2 bag system we have for garlic. We have newer garlic in the bag to the right, and then the older garlic in the bag to the left. This is good for when you have garlic from last week and newer garlic and you want to know which one you should use first so you don't end up letting old garlic get past its prime. The largest bag is for onions and potatoes and looks kind of gross and stained, but it's really useful. The stretchy nature of these three bags allows us to store more stuff in them than you would think possible..
Kitchen hack #4: Freeze veggie scraps for vegetable stock
We'd heard of storing veggie scraps in the fridge, and yes, we've tried it. What is the result? A bowl of slimy, rotting veggie scraps judging you for not getting around to making vegetable stock in time. The solution? Freeze 'em. What is a suitable veggie scrap? Pieces of onion, garlic, mushrooms, carrot peels, leek stems, sweet potato peels. What is disgusting? Beet peels, kale stems, or putting in too much onion and garlic. The freezer doesn't keep these scraps good indefinitely, but it keeps them good long enough for us to get around breaking out the Fagor plug-in electric pressure cooker to make stock.
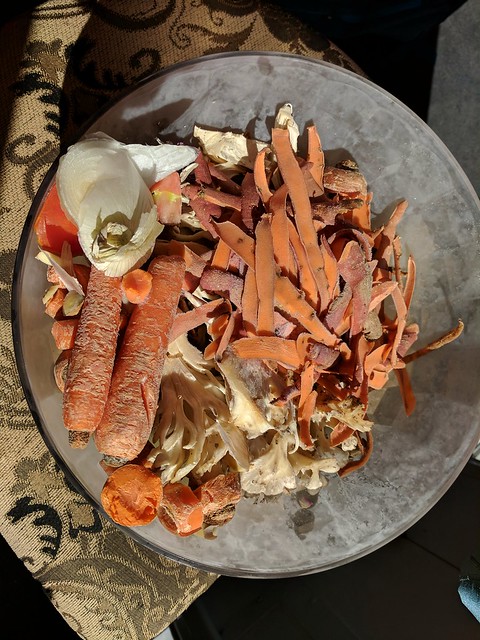
You can freeze the resulting vegetable stock in 2-3 cup containers for later use in recipes.
Kitchen hack #5 Freeze unused pastes and sauces
Hot pasta is draining in the sink. You grab that half used pasta sauce from the fridge before the pasta starts sticking together, only to discover it's growing mold. Yep, we've all been there. But not anymore! The minute you use the first half of the pasta sauce, break out your ice cube tray (go buy one for crying out loud), and pour the second half you're not using into the tray. Once they are frozen, remove them and place in an air-tight tupperware. You're not done yet! Now grab a rubber band, masking tape, and a sharpie. Wrap the masking tape around the rubber band, and then write "pasta sauce" on the masking tape, and put the rubber band around the tupperware. I've tried lots of methods of labeling my frozen cubes, and this one works out the best.
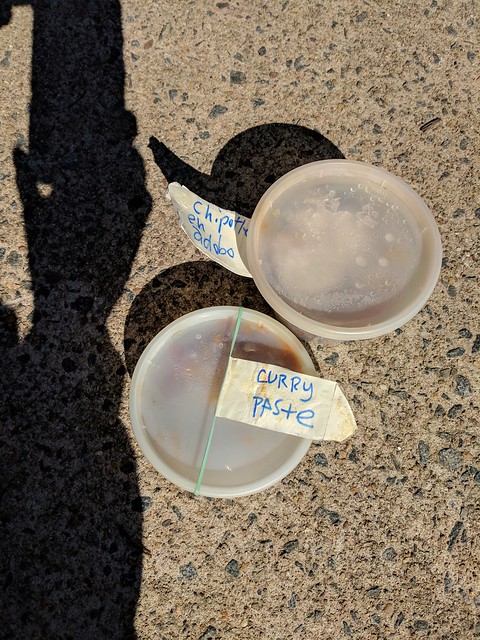
What half-used things should you be making ice cubes out of?
- Pasta sauce
- Tomato paste
- Thai curry paste
- Dijon mustard
- Diced ginger (moisten diced ginger slightly to get a better ice cube)
- Chipotles en adobo
- Applesauce (for baking purposes)
Things which have not worked out so well are: lemon zest (get too dried out and tastes like nothing), lemon juice (I don't know why, we just can't seem to remember it's in there). For a while we had a whiteboard on the fridge listing what we had, but the magnets broke and we haven't replaced it.
Kitchen hack #6: Don't let your cilantro go bad!
You don't have to buy some silly plastic container that holds hardly any cilantro like I've seen in some kitchens. As long as you have a coffee mug, a knife, and a plastic bag, you got this.
Make sure you're buying decently fresh cilantro - no yellow leaves, no rotting leaves, no black areas. Yuck. This only keeps good cilantro good, it's not making zombie cilantro out of your half rotting cilantro.
Moving on. Take your just-purchased green and healthy cilantro and chop the very ends off. This ensures that if the ends have hardened and can't take in water anymore, you're removing them and leaving a stem which can absorb water.
Fill a mug halfway to 2/3 full with water, and put the cilantro stem down into the water. Make sure the cilantro stem ends reach the water and have a little leeway in case of evaporation. Cover the mug and cilantro with a plastic bag, and put in the fridge. Yes, I said put in the fridge.
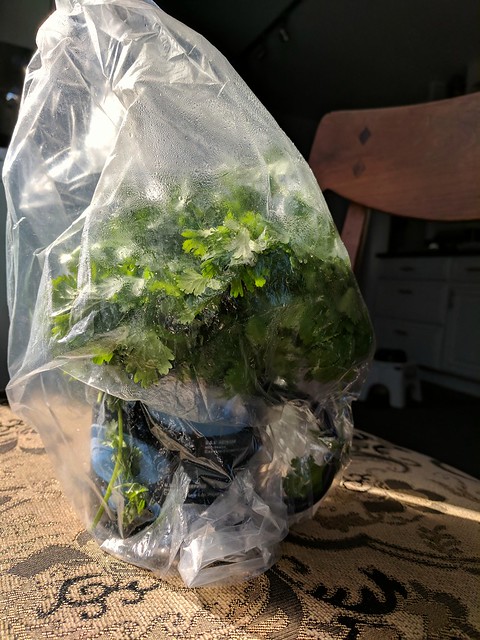
Your cilantro will stay better so, so much longer. You'll eat tacos or baingan bharta, and everyone will be happy.
Kitchen hack #7 Cook on the couch
Feeling too lazy to do all of the chopping and prep work for a nice meal? Rather than giving up, move the washed veggies to peel & chop to a cutting board on a coffee table in front of your couch. Sit on your butt and chop while watching Netflix or listening to music or chatting or something, then head to the kitchen with everything pre-chopped. You feel like you're on a cooking show with everything all ready to toss in!
Monday, July 10, 2017
Review of new vegan (non-dairy) Häagen-Dazs ice cream
OK, so this week Häagen-Dazs dropped four new vegan ice cream flavors, and I couldn't find any reviews online. So we decided to give then a try. Sadly the locator page on their web site is misleading, it found three stores that should have had them but didn't (none of the staff had even heard of the new flavors) and failed to show the Target down the street that did (I heard that Target is the only place selling them other than Häagen-Dazs stores. But eventually we picked up all four flavors: coconut caramel, peanut butter chocolate fudge, chocolate salted fudge truffle, and mocha chocolate cookie:
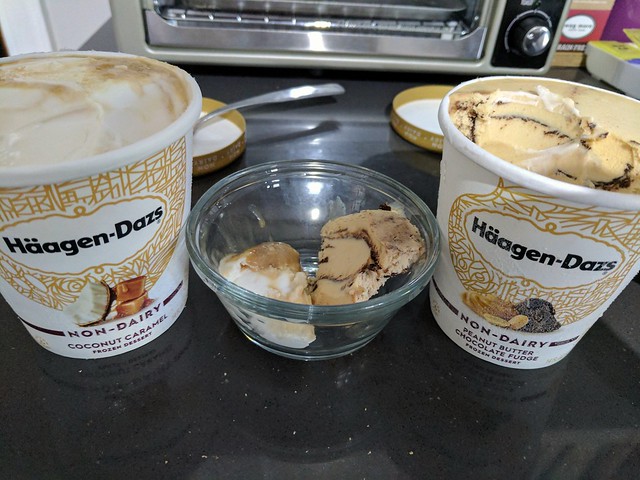
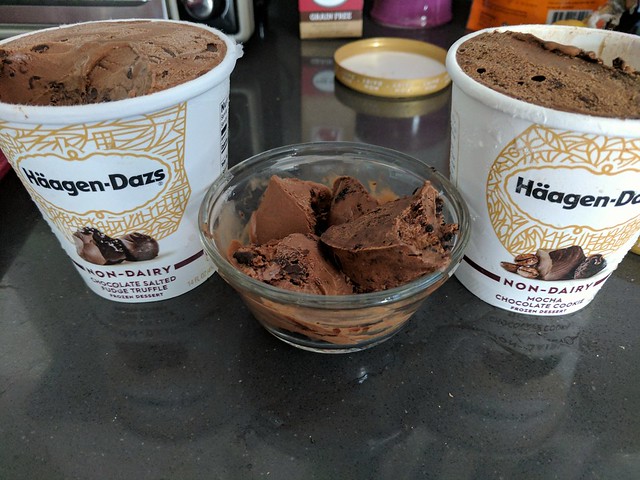
OK, so what was the verdict? The key thing is that this is really intense, rich, sweet ice cream. Compared to most other vegan brands it just has a much denser and heavy feel. But they are delicious! The mouthfeel is better to me than the new Ben & Jerry's (which feels a bit more crystalline), but it's also so dense it's almost a bit chewy (especially the coconut caramel). I think So Delicious and other brands incorporate more air or something for a smoother and less intense flavor. But if you are the kind of person that likes chocolate lava cake or triple chocolate mousse / cake /etc. this should be right up your alley.
My favorites were the chocolate truffle (very fudgy and intense) and the peanut-butter chocolate (also very intense, but the PB and chocolate made for more balance). I also liked the mocha cookie quite a bit but the texture of the chocolate pieces in the truffle was way better to me. Coconut caramel was OK but to me was too sweet (similar to So Delicious Dulce de Leche, while the chocolate truffle was like their old Purely Decadent flavor with chocolate swirl and chunks, but even richer).
Vegan Lady liked mocha and PB&chocolate best, then truffle, and coconut last. Our neighbor and her daughter came over and liked the coconut best followed by mocha, but also liked them all.
So I'd say that if you like ice cream, give these a try, but be sure to find some people to split them with, as if you eat the whole pint you will be in pain!
OK, so what was the verdict? The key thing is that this is really intense, rich, sweet ice cream. Compared to most other vegan brands it just has a much denser and heavy feel. But they are delicious! The mouthfeel is better to me than the new Ben & Jerry's (which feels a bit more crystalline), but it's also so dense it's almost a bit chewy (especially the coconut caramel). I think So Delicious and other brands incorporate more air or something for a smoother and less intense flavor. But if you are the kind of person that likes chocolate lava cake or triple chocolate mousse / cake /etc. this should be right up your alley.
My favorites were the chocolate truffle (very fudgy and intense) and the peanut-butter chocolate (also very intense, but the PB and chocolate made for more balance). I also liked the mocha cookie quite a bit but the texture of the chocolate pieces in the truffle was way better to me. Coconut caramel was OK but to me was too sweet (similar to So Delicious Dulce de Leche, while the chocolate truffle was like their old Purely Decadent flavor with chocolate swirl and chunks, but even richer).
Vegan Lady liked mocha and PB&chocolate best, then truffle, and coconut last. Our neighbor and her daughter came over and liked the coconut best followed by mocha, but also liked them all.
So I'd say that if you like ice cream, give these a try, but be sure to find some people to split them with, as if you eat the whole pint you will be in pain!
Thursday, June 1, 2017
Nicoise salad with collard green seed pod "beans"
We let our collard greens flower and go to seed this year, and have been curious to try eating the "beans" which are good and tender if you get them when they're still small:
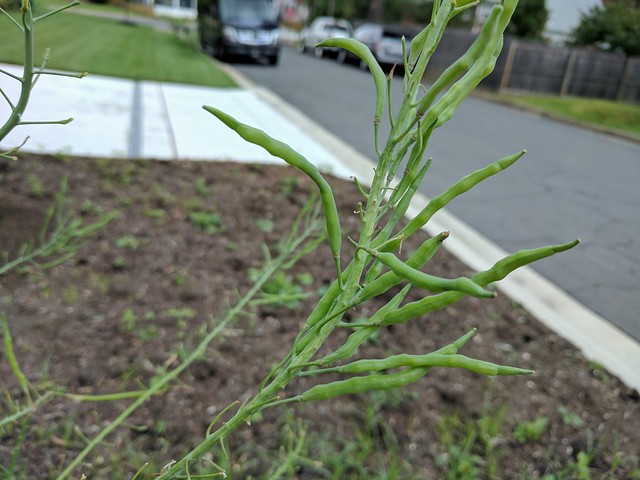
We ended up putting them on top of a Nicoise salad, which was tasty:
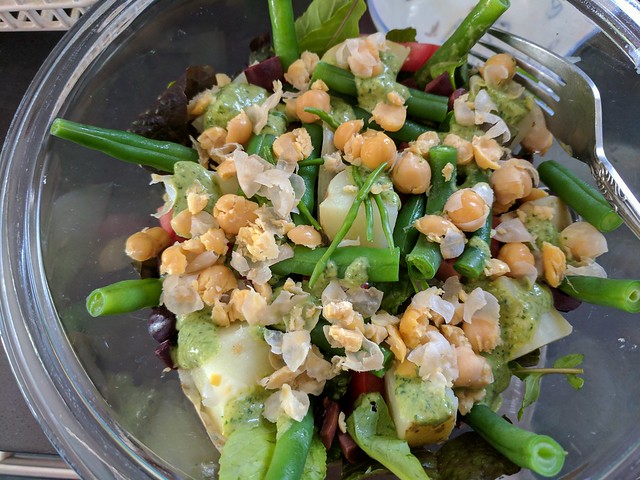
We ended up putting them on top of a Nicoise salad, which was tasty:
Monday, May 8, 2017
Soil Horizons Cake for Earth Day
How better to celebrate Earth Day than with a soil cake? We
didn’t just want a boring chocolate “dirt cake” with gummi worms in it; we
wanted a proper soil profile with the different horizons represented (see the printout at the bottom of the photo below). In the
end we discarded some of our more fanciful ideas and went with a relatively
design involving 3 layers plus toppings. Here are the components prior to assembly:
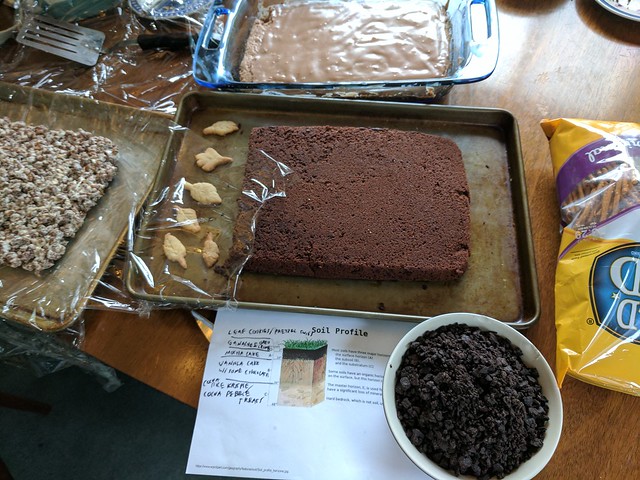
For the bottom layer (E horizon) we wanted “rocks” of different sizes so used the health food store equivalent of cocoa rice crispies and cocoa pebbles in a vegan marshmallow base (basically heterogeneous vegan rice crispie treats), shown at left in the photo above.
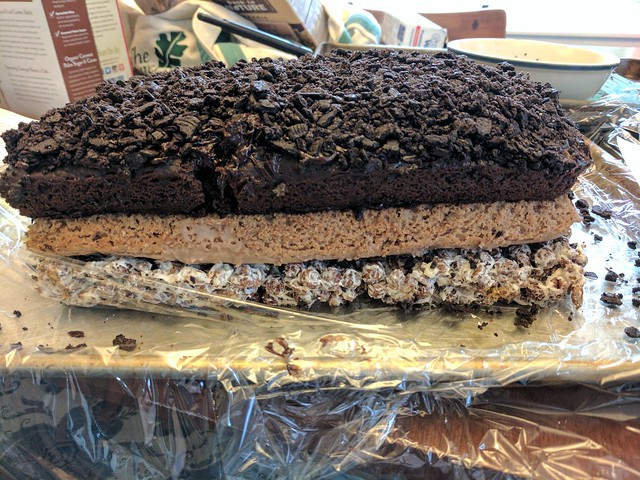
For the bottom layer (E horizon) we wanted “rocks” of different sizes so used the health food store equivalent of cocoa rice crispies and cocoa pebbles in a vegan marshmallow base (basically heterogeneous vegan rice crispie treats), shown at left in the photo above.
On top of that we wanted sort of a tan cake for the leached
B horizon, so after considering mocha or spice cake we kept it simple and went
with a vegan vanilla cake recipe and just added 1.5 Tbsp of cocoa powder. The
cake recipe was terrible though, so this layer came out fairly dry, and next
time I’d use a tried and true vanilla recipe before mixing in a bit of cocoa.
We put basic powdered sugar icing (with a bit of cocoa to match the color)
above and below this layer to help bind it to the other layers (top cake in photo above).
The top layer was a mocha cake (the bottom cake in photo above), lighter than a pure
chocolate cake but still a nice rich brown for the A horizon. Then we put a
mocha ganache on top of that to hold the oreo crumble on top (we used oreo
thins with chocolate filling), and topped with a few sugar cookie “leaves.” We
also planned to have pretzel stick “twigs” but the dog got into the bag of
pretzels the night before so had to give up on that.
Here’s how it looked once assembled:
Here’s how it looked once assembled:
Once it was assembled we cooled it in the fridge before
cutting the edges flush for a neater look:
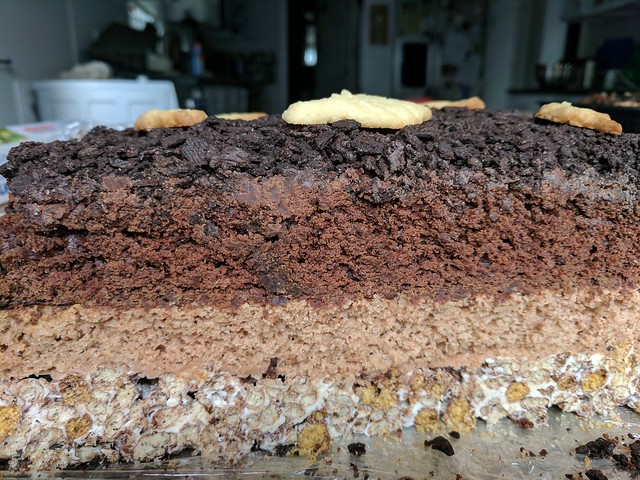
Here's an oblique shot from above:
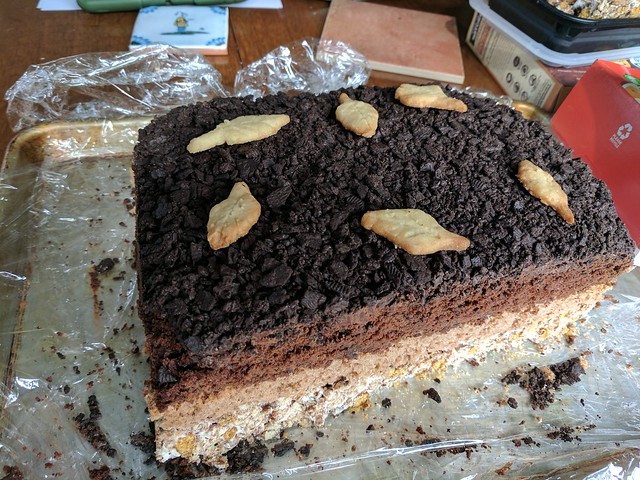
Sadly the time in the fridge dried out the cake a bit, so we had to serve it with vegan Breyer’s cookies and cream, and poured some of the new vegan Bailey’s Irish cream on the cake as well. But that's not an awful worst case. We had some of the leftovers in glasses as a trifle and it worked pretty well.
Here's an oblique shot from above:
Sadly the time in the fridge dried out the cake a bit, so we had to serve it with vegan Breyer’s cookies and cream, and poured some of the new vegan Bailey’s Irish cream on the cake as well. But that's not an awful worst case. We had some of the leftovers in glasses as a trifle and it worked pretty well.
We also wanted to make roots / mycorrhizae out of white
cotton candy which we could jam into the cake, but couldn’t find it. But a
simpler idea would have been to bend up a hangar into a jagged shape, poke
several sinuous holes in the cake from above, and fill each with thin white
icing, so that when you cut into it you can see the roots. Next time!
Wednesday, July 13, 2016
Vegan goat cheese (chevré), round 2
It's been a while, so I decided to make the goat cheese recipe from VegNews (a modified version of the one in Miyoko Schinner's book) but without the herbs de provence. It turns out making it in summer is pretty different; it ages a lot faster but thickens more slowly! I decided I wanted a different flavor profile so changed up the herbs.
Here's the last of the final product (it is so tasty I usually eat a lot of it before I remember to take a picture):
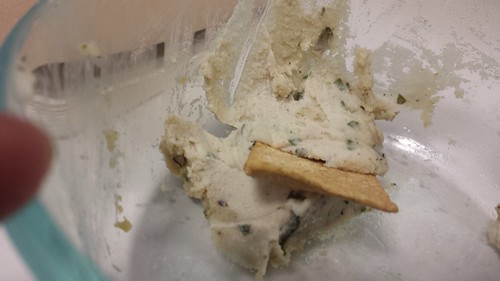
You need to plan about a week in advance of when you want to eat the cheese.
First, make some rejuvelac:
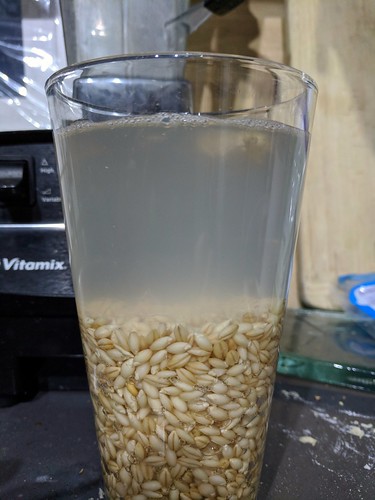
To make 2 cups of rejuvelac (enough for many cheeses): soak 1/2 cup whole grains (i used quinoa, which makes for a less disgusting flavor than rye or barley or wheat) in 2 cups of water for 8-12 hours. Drain it and fill with more water, changing it 3 times per day, until the grains begin sprouting, then drain again. put the grains and 2 cups of fresh water in a jar and cover with a towel or cheesecloth. Let it sit for 2 days or so, until the liquid turns white, then strain out the grains to have your rejuvelac. It should look like this before you strain it, and you can keep it in the fridge for several weeks:
Then soak the cashews (2 cups, raw) for at least 3-4 hours, or overnight.
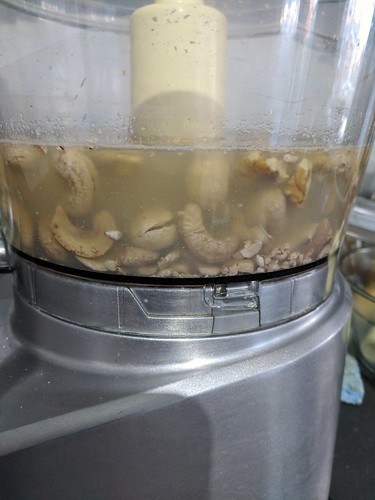
Then blend until very smooth (I use a food processor, a blender or vitamix works but requires a lot more scraping and pushing and more liquid):
2 cups raw cashews, soaked
1/4-3/8 cup rejuvelac (I use 3/8 to make blending easier, but if you want it thicker use 1/4)
1/2 tsp salt
1 small clove garlic
When smooth, either add these whole and blend for a bit, or chop them up and mix it in. If you blend them all together you will have green cheese which will skeeve people out, otherwise you have nice green flecks as shown above:
~1/4 cup fresh basil leaves
1 Tbsp fresh rosemary leaves
1 Tbsp nutritional yeast
1 tsp lemon juice
whatever other herbs / spices sound good (e.g. in winter I use dried herbs de provence rather than fresh basil and rosemary)
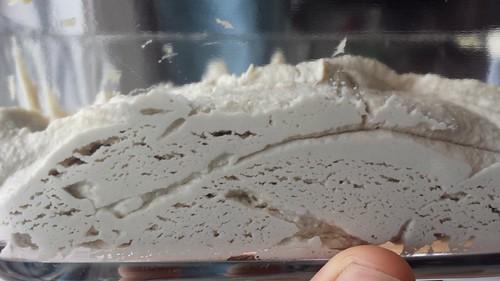
Put it in a bowl, and let it sit out for ~ 24 hours; if it's cool weather you might need 2 days. You want it to start tasting a bit sharp and funky, but not too much. When it looks like this, your bacteria are going nuts (producing those little gas pockets) and you need to move on to the next step:
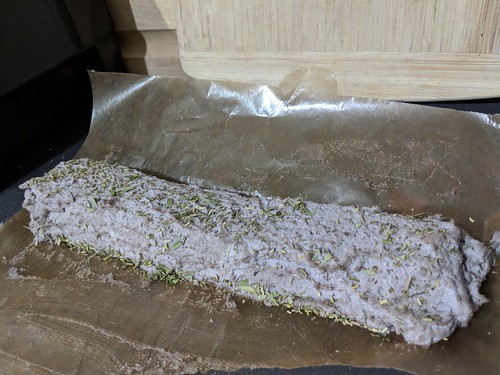
Now you're supposed to shape this into a log using some parchment paper, but especially if it's hot and humid, you will find that it got funky fast, but didn't thicken up much. But generally it's loose enough I have to just spoon it into a rough log shape on parchment paper and smooth it out. Sprinkle on about 1/4 tsp of salt (ideally powdered in a spice grinder first) evenly over the log. Alternatively, if it's runny enough that it won't hold its shape, put it in the fridge for a day to get thick before making the log. Here's a pic of the pre-aged log, but note the color is weird b/c in this pic I used some walnuts too:
Finally, let it sit out for about 2-3 days until it has thickened a bit and is super tasty. There will be sort of a rind that's thicker and more dry but it's all good.
Here's the last of the final product (it is so tasty I usually eat a lot of it before I remember to take a picture):
You need to plan about a week in advance of when you want to eat the cheese.
First, make some rejuvelac:
To make 2 cups of rejuvelac (enough for many cheeses): soak 1/2 cup whole grains (i used quinoa, which makes for a less disgusting flavor than rye or barley or wheat) in 2 cups of water for 8-12 hours. Drain it and fill with more water, changing it 3 times per day, until the grains begin sprouting, then drain again. put the grains and 2 cups of fresh water in a jar and cover with a towel or cheesecloth. Let it sit for 2 days or so, until the liquid turns white, then strain out the grains to have your rejuvelac. It should look like this before you strain it, and you can keep it in the fridge for several weeks:
Then soak the cashews (2 cups, raw) for at least 3-4 hours, or overnight.
Then blend until very smooth (I use a food processor, a blender or vitamix works but requires a lot more scraping and pushing and more liquid):
2 cups raw cashews, soaked
1/4-3/8 cup rejuvelac (I use 3/8 to make blending easier, but if you want it thicker use 1/4)
1/2 tsp salt
1 small clove garlic
When smooth, either add these whole and blend for a bit, or chop them up and mix it in. If you blend them all together you will have green cheese which will skeeve people out, otherwise you have nice green flecks as shown above:
~1/4 cup fresh basil leaves
1 Tbsp fresh rosemary leaves
1 Tbsp nutritional yeast
1 tsp lemon juice
whatever other herbs / spices sound good (e.g. in winter I use dried herbs de provence rather than fresh basil and rosemary)
Put it in a bowl, and let it sit out for ~ 24 hours; if it's cool weather you might need 2 days. You want it to start tasting a bit sharp and funky, but not too much. When it looks like this, your bacteria are going nuts (producing those little gas pockets) and you need to move on to the next step:
Now you're supposed to shape this into a log using some parchment paper, but especially if it's hot and humid, you will find that it got funky fast, but didn't thicken up much. But generally it's loose enough I have to just spoon it into a rough log shape on parchment paper and smooth it out. Sprinkle on about 1/4 tsp of salt (ideally powdered in a spice grinder first) evenly over the log. Alternatively, if it's runny enough that it won't hold its shape, put it in the fridge for a day to get thick before making the log. Here's a pic of the pre-aged log, but note the color is weird b/c in this pic I used some walnuts too:
Finally, let it sit out for about 2-3 days until it has thickened a bit and is super tasty. There will be sort of a rind that's thicker and more dry but it's all good.
Wednesday, December 16, 2015
Thanksgiving!
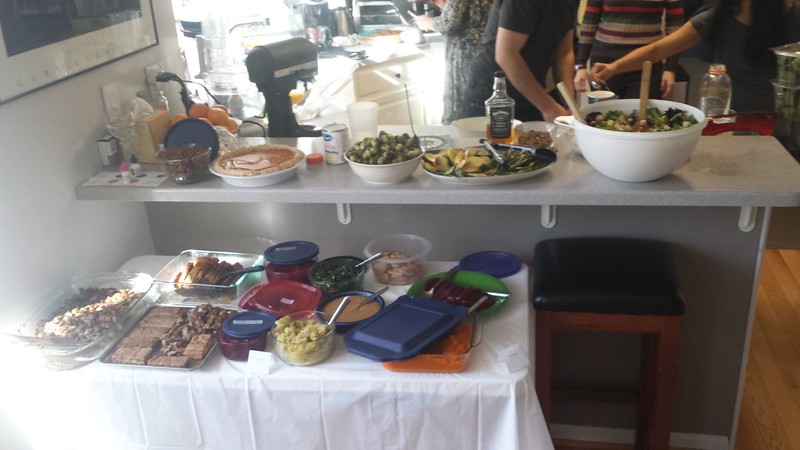 For thanksgiving, between my sister and law and we made (left to right, bottom row first): stuffing (or dressing), fried tom tofu, "forager's roast" from field roast, two kinds of fresh cranberry sauce (one sweet with bourbon and shallots, one tart with orange and ginger), garlicky collard greens, mashed potatoes, gravy, salad, squash soup, sweet potatoes, cranberry sauce from a can, brussel sprouts, roasted squash, salad, roasted asparagus, sugar cookies, sweet potato pie, spicy cinnamon pecans.
Recipes for the stuffing, cranberry sauce(s), tom tofu, sugar cookies, and spicy cinnamon pecans are at http://food.sciencejon.com
Happy belated holidays!
Saturday, July 18, 2015
Vegan brie-off
OK, should you spring for the extra $ involved in buying a commercial brie kit from Druid's Grove (still requiring preparation at home, but it's pretty easy), or spend the extra time required to make it from scratch? It depends! Here are the two contenders:
Commercial brie (we made this twice, once with coconut oil and once with deodorized cocoa butter: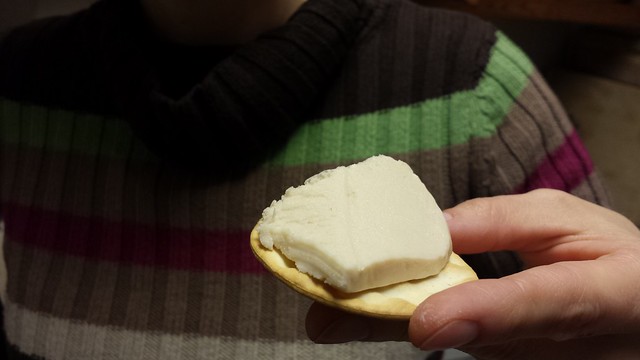 Homemade brie: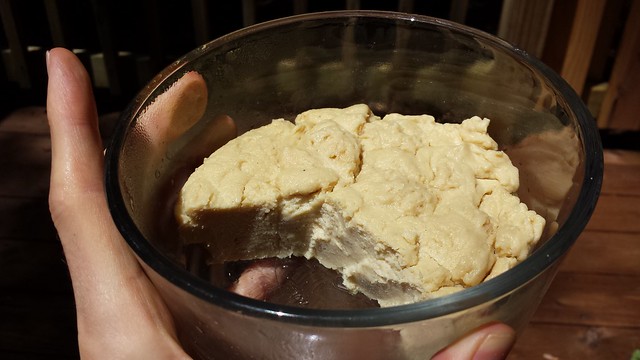
Homemade brie in proper context (on homemade foccacia with broccoli and veggie sausage sautéed in red wine. Damn.):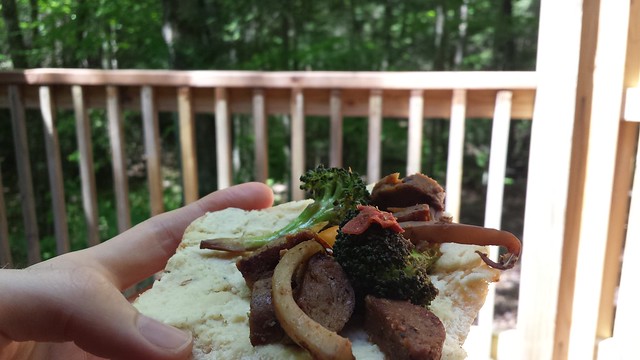
So, the commercial brie has a clearly superior texture and look. It is super smooth and melts in your mouth. Flavor is very mild, no one who knew what brie tasted like thought this cheese tasted like brie, or even like much of a cheese at all. But it was really good on crackers nonetheless.
The homemade brie (I went with the variant that maximized flavor and let it age extra time to really compare with the milder commercial one) was also good, and had more flavor (closer to real brie, but still distant), but not as smooth a texture. I will say that as it continued to age in the fridge it got a really nice sharp taste, and was good in several dishes. Oh, but the cashews do give it a bit of a sweet taste which is uncool.
Ultimately given the ease and texture, we would go with the commercial brie. But at $20?! We will instead focus on homemade cheeses that came out better at home like the gruyere and gouda (also from Miyoko Schinner's book). One downside of both bries is that they are extra-fatty since they have coconut oil in them for texture, and having it in your fridge is definitely encouraging.
Hopefully sometime soon we will have commercially available premade vegan cheese that actually passes both texture and flavor tests. There are a few aged vegan cheeses on the market, but none of them are great, and they're all pretty expensive. Stay tuned!
Commercial brie (we made this twice, once with coconut oil and once with deodorized cocoa butter:
Homemade brie:Homemade brie in proper context (on homemade foccacia with broccoli and veggie sausage sautéed in red wine. Damn.):
So, the commercial brie has a clearly superior texture and look. It is super smooth and melts in your mouth. Flavor is very mild, no one who knew what brie tasted like thought this cheese tasted like brie, or even like much of a cheese at all. But it was really good on crackers nonetheless.
The homemade brie (I went with the variant that maximized flavor and let it age extra time to really compare with the milder commercial one) was also good, and had more flavor (closer to real brie, but still distant), but not as smooth a texture. I will say that as it continued to age in the fridge it got a really nice sharp taste, and was good in several dishes. Oh, but the cashews do give it a bit of a sweet taste which is uncool.
Ultimately given the ease and texture, we would go with the commercial brie. But at $20?! We will instead focus on homemade cheeses that came out better at home like the gruyere and gouda (also from Miyoko Schinner's book). One downside of both bries is that they are extra-fatty since they have coconut oil in them for texture, and having it in your fridge is definitely encouraging.
Hopefully sometime soon we will have commercially available premade vegan cheese that actually passes both texture and flavor tests. There are a few aged vegan cheeses on the market, but none of them are great, and they're all pretty expensive. Stay tuned!
Friday, May 15, 2015
Homeade alcohol-free stout beer
We continue to enjoy drinking homemade alcohol-free beer whenever one of us can't drink (most recently while my broken pelvis heals). My friend Emily was intrigued (we were discussing it when she was pregnant) but prefers stouts, and we hadn't done anything beyond the one kind we've made (which is sort of like a session IPA, see http://veganladyeats.blogspot.com/2014/09/homemade-alcohol-free-relaxing-beer.html).
But always up for a challenge, here are the tweaks to make stout. First, rather than making the hops extract one batch at a time I've switched to making a big container of it, and then using about 1/2 cup of that plus sweetener and club soda. So for stout, I took the 1/2 cup of cold hops tea / extract, heated it up in the microwave until it was almost boiling, and then put in a fake coffee teabag (Teecino Vanilla Nut flavor). I put it back in the fridge again right away and let it steep and cool for about 4 hours. For sweetener I used Yacon syrup which is a new thing we just bought; it's a tangy and lightly sweet dark brown syrup made from some Peruvian root. I thought of molasses but didn't want that heavy iron flavor molasses has.
Here is the final result being enjoyed, it came out pretty good! It definitely has the roasty malty stout flavor, without any alcohol and with very few calories.

My next step is to figure out two things:
1. If I can soak some additional hops in the extract to add back in the aroma and more complex flavor lost when I boil down the extract.
2. I want to try proofing maybe 1/16 tsp of yeast when the beer is being put together to drink to add in a bit of yeasty flavor, without giving the yeast time to make any actual alcohol.
But always up for a challenge, here are the tweaks to make stout. First, rather than making the hops extract one batch at a time I've switched to making a big container of it, and then using about 1/2 cup of that plus sweetener and club soda. So for stout, I took the 1/2 cup of cold hops tea / extract, heated it up in the microwave until it was almost boiling, and then put in a fake coffee teabag (Teecino Vanilla Nut flavor). I put it back in the fridge again right away and let it steep and cool for about 4 hours. For sweetener I used Yacon syrup which is a new thing we just bought; it's a tangy and lightly sweet dark brown syrup made from some Peruvian root. I thought of molasses but didn't want that heavy iron flavor molasses has.
Here is the final result being enjoyed, it came out pretty good! It definitely has the roasty malty stout flavor, without any alcohol and with very few calories.
My next step is to figure out two things:
1. If I can soak some additional hops in the extract to add back in the aroma and more complex flavor lost when I boil down the extract.
2. I want to try proofing maybe 1/16 tsp of yeast when the beer is being put together to drink to add in a bit of yeasty flavor, without giving the yeast time to make any actual alcohol.
Sunday, April 19, 2015
Soft Food for Sore Mouths Part 2
Gum surgery was so fun I went and had the other side done three weeks later! ;) While Sarah did an amazing job of meal planning after the first surgery, we did want to change it up.
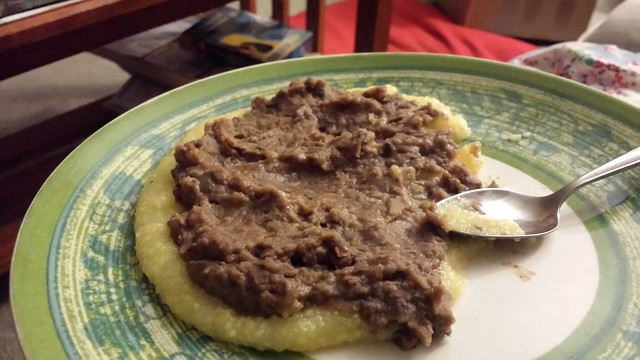
There were several excellent soups we hadn't had yet (African groundnut, creamy tomato, corn chowder, etc.) but we started with simple refried beans. I didn't want to eat them plain, so Sarah had the brilliant idea to serve them over soft polenta!
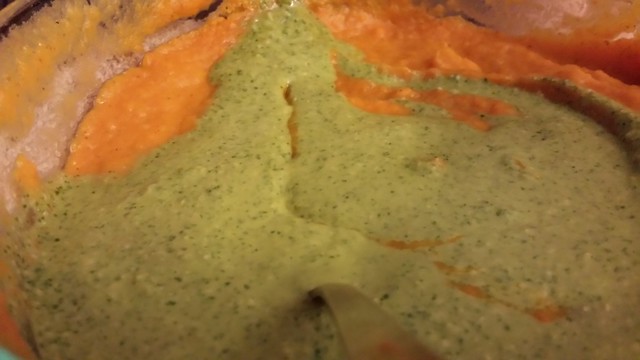
Next was one of our favorite recipes adjusted to not require any chewing. It's supposed to be chickpea crepes with a sweet potato curry, so we skipped the crepes and also just roasted the sweet potatoes whole and blended them rather than chopping them up and eating them as cubes.
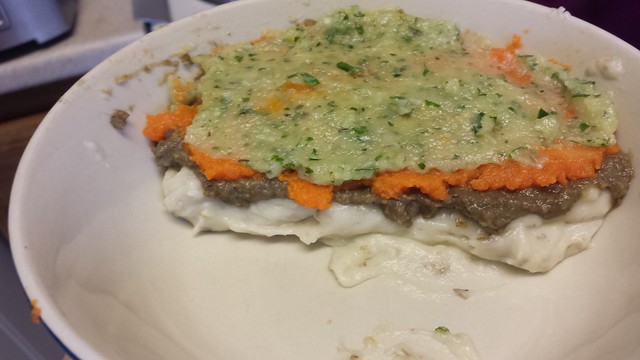
Getting more creative, Sarah came up with the idea for blended Shepherd's pie! Each layer (mashed potato, lentils/mushrooms, carrots, peas) were separately seasoned and blended before being assembled:
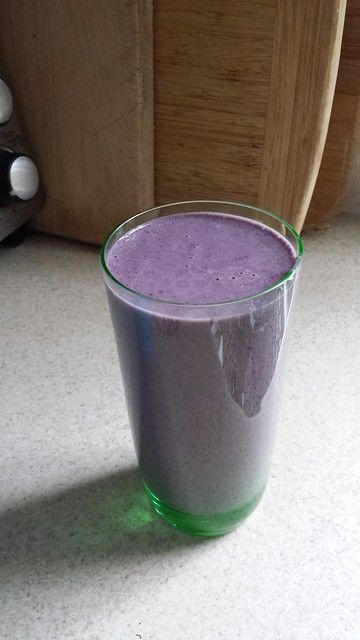
For breakfast I mostly relied on blending up oatmeal with some almond milk, peanut butter to help me last until lunch, and thawed frozen blueberries. It comes out kind of goopy and gross honestly but it was easy to drink:
And then I forgot to take photos of the African groundnut stew with red swiss chard in it, but that was also delicious and creamily soft! This definitely made the recovery process much more pleasant! I find that even weeks later I still can't eat cold foods like ice cream, so milkshakes (a frequent suggestion for a soft food) were definitely not going to work as well as these did.
There were several excellent soups we hadn't had yet (African groundnut, creamy tomato, corn chowder, etc.) but we started with simple refried beans. I didn't want to eat them plain, so Sarah had the brilliant idea to serve them over soft polenta!
Next was one of our favorite recipes adjusted to not require any chewing. It's supposed to be chickpea crepes with a sweet potato curry, so we skipped the crepes and also just roasted the sweet potatoes whole and blended them rather than chopping them up and eating them as cubes.
Getting more creative, Sarah came up with the idea for blended Shepherd's pie! Each layer (mashed potato, lentils/mushrooms, carrots, peas) were separately seasoned and blended before being assembled:
For breakfast I mostly relied on blending up oatmeal with some almond milk, peanut butter to help me last until lunch, and thawed frozen blueberries. It comes out kind of goopy and gross honestly but it was easy to drink:
And then I forgot to take photos of the African groundnut stew with red swiss chard in it, but that was also delicious and creamily soft! This definitely made the recovery process much more pleasant! I find that even weeks later I still can't eat cold foods like ice cream, so milkshakes (a frequent suggestion for a soft food) were definitely not going to work as well as these did.
Saturday, April 4, 2015
Making an "Alien" themed chestburster cake
Our friend Riley who hosted the epic Jurassic Park-ty for his birthday last year decided to go with a theme from the movie Alien this year. The obvious response was to make a torso cake with the "chestburster" phase of the alien actually bursting from the cake. Here's how that went down. The basic ingredients were 1 cake, black cherry juice, pectin, and official Alien chestburster chopsticks (in lieu of making a homemade one out of flour / water / salt).
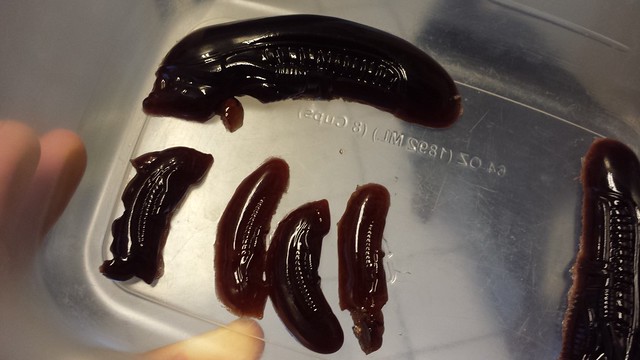
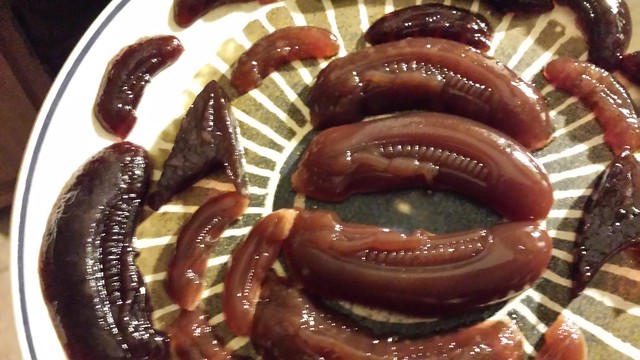
Step 1 was to prepare by making the "guts." We were already using pectin and black cherry juice to make alien-head gummies using a mold (the second photo has some with pineapple-cherry juice for better flavor), with the all-cherry ones in particular looking and feeling super creepy like a blood clot or engorged leeches:
so the ones that didn't come out right were just mixed up into chunky blood-red guts.
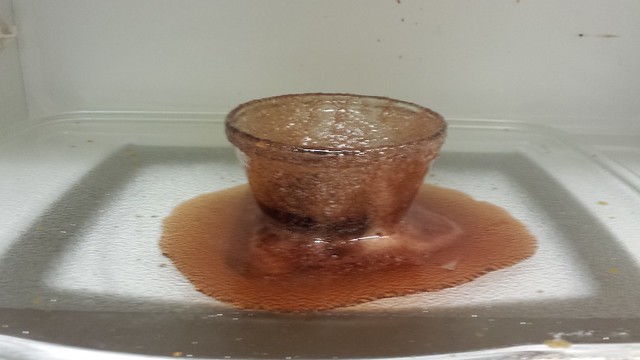
Note: if making gummies in the microwave in tiny batches because you only have one stupid tiny mold, be sure to watch the juice carefully to prevent this:
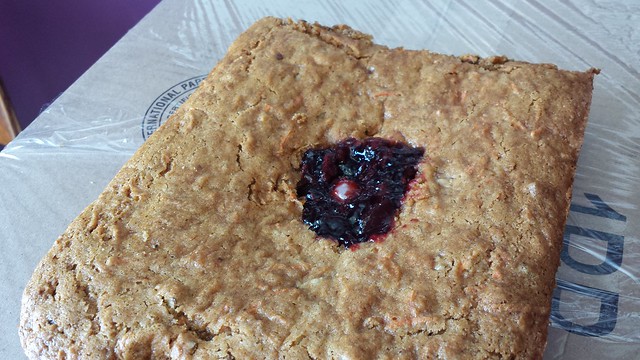
Step 2 was to make an ordinary carrot cake. We put it on top of a large cardboard box with plastic wrap on top, and a hole cut for the chopstick. We scooped out a shallow divot to make room for some guts. We also adjusted the alien chopstick to the right "resting" height before emerging (you can see the white tip peeking out) so that we could secure it in the box properly:
Step 3: we don't just need the alien head to be just below the cake surface before emergence, we also need it to go to just the right height when it's pushed up so that you see the whole thing but not the boring chopstick part. That's what the sideways chopstick is for, to set the emergent height. The plastic eyedropper full of cherry juice was also carefully aligned so that the nozzle tip is at the cake surface but not high enough to be visible when the alien bursts out. In initial tests the juice shot up about 3 feet, so I played around with plain water to figure out how much pressure to use to get a good spurt without making a huge mess.
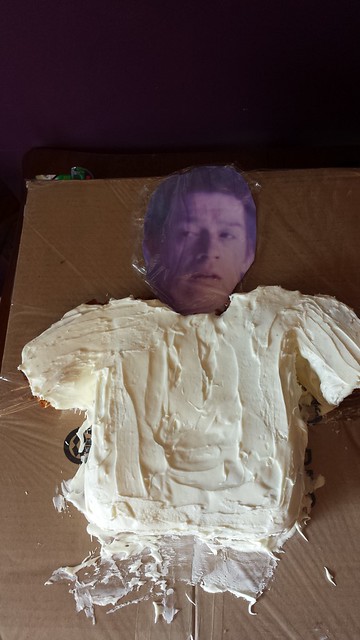
Step 4: Ice it up (we used gross icing from the store to save time), and add a plastic-wrapped printout of John Hurt's head to provide a clue as to what's going on here.
Here's the cake on the box (sides of arms un-iced b/c we didn't have enough) and my hands in the box ready to go, just waiting for Sarah to hit play on my cell phone to start the audio file from the actual scene in the movie with the alien bursting out and screeching"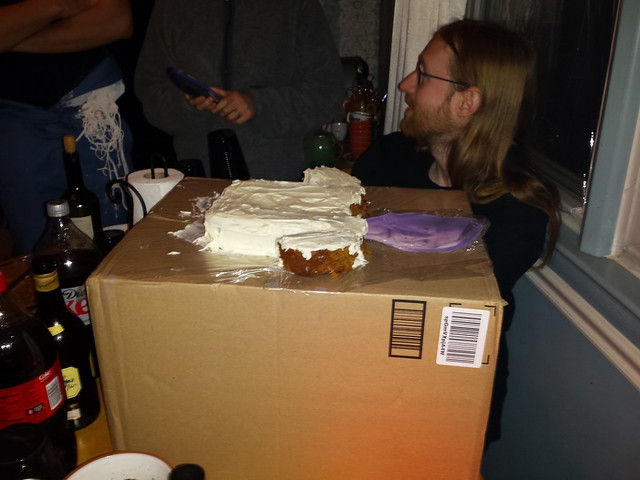
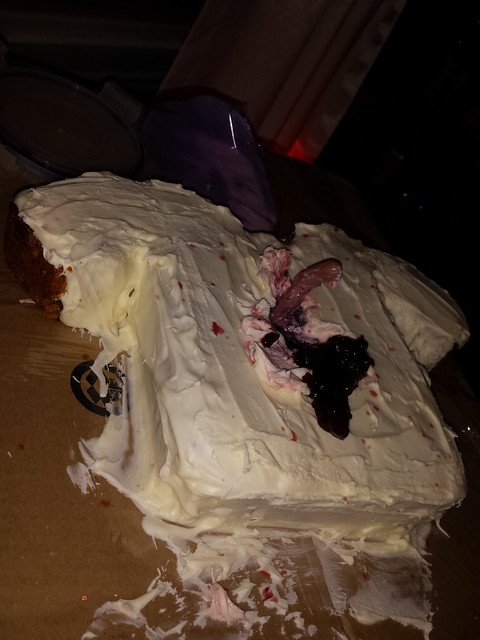
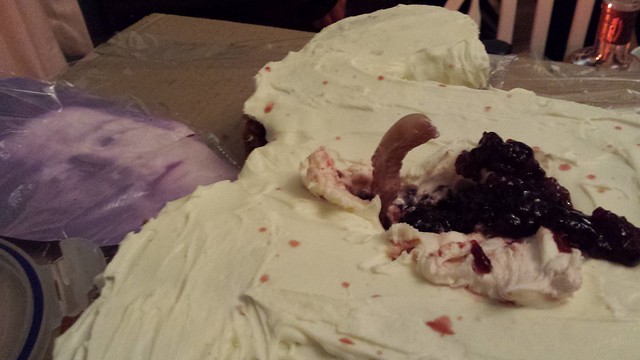
And here's what it looked like after emerging. Sadly our video footage of the event didn't take when Sarah's phone froze up. Also, you can see that there is some cherry juice speckled all over the cake, but unfortunately when the cake was being moved the nozzle tip ended up pressing into the chopstick base such that it was just a gentle spitting rather than a real eruption of fake blood. Also, the extra guts below the alien were applied after emergence when we realized that most of the guts below the icing were invisible. Alas.
Despite the minor problems, it was still a lot of fun! Sarah and I went for free costumes by printing out alien facehuggers and taping twisties to the legs so that they would grip our faces and hang onto our glasses:

Most costumes were more impressive, especially the adult alien and power loader exoskeleton!

Step 1 was to prepare by making the "guts." We were already using pectin and black cherry juice to make alien-head gummies using a mold (the second photo has some with pineapple-cherry juice for better flavor), with the all-cherry ones in particular looking and feeling super creepy like a blood clot or engorged leeches:
so the ones that didn't come out right were just mixed up into chunky blood-red guts.
Note: if making gummies in the microwave in tiny batches because you only have one stupid tiny mold, be sure to watch the juice carefully to prevent this:
Step 2 was to make an ordinary carrot cake. We put it on top of a large cardboard box with plastic wrap on top, and a hole cut for the chopstick. We scooped out a shallow divot to make room for some guts. We also adjusted the alien chopstick to the right "resting" height before emerging (you can see the white tip peeking out) so that we could secure it in the box properly:
Step 3: we don't just need the alien head to be just below the cake surface before emergence, we also need it to go to just the right height when it's pushed up so that you see the whole thing but not the boring chopstick part. That's what the sideways chopstick is for, to set the emergent height. The plastic eyedropper full of cherry juice was also carefully aligned so that the nozzle tip is at the cake surface but not high enough to be visible when the alien bursts out. In initial tests the juice shot up about 3 feet, so I played around with plain water to figure out how much pressure to use to get a good spurt without making a huge mess.
Step 4: Ice it up (we used gross icing from the store to save time), and add a plastic-wrapped printout of John Hurt's head to provide a clue as to what's going on here.
Here's the cake on the box (sides of arms un-iced b/c we didn't have enough) and my hands in the box ready to go, just waiting for Sarah to hit play on my cell phone to start the audio file from the actual scene in the movie with the alien bursting out and screeching"
And here's what it looked like after emerging. Sadly our video footage of the event didn't take when Sarah's phone froze up. Also, you can see that there is some cherry juice speckled all over the cake, but unfortunately when the cake was being moved the nozzle tip ended up pressing into the chopstick base such that it was just a gentle spitting rather than a real eruption of fake blood. Also, the extra guts below the alien were applied after emergence when we realized that most of the guts below the icing were invisible. Alas.
Despite the minor problems, it was still a lot of fun! Sarah and I went for free costumes by printing out alien facehuggers and taping twisties to the legs so that they would grip our faces and hang onto our glasses:
Most costumes were more impressive, especially the adult alien and power loader exoskeleton!
Monday, March 23, 2015
Soft Food for Sore Mouths: Four Delicious Hearty Soups
After gum surgery, I had to eat nothing but super soft foods for about a week, and was pretty bummed about it. But Sarah managed to think of five delicious and creamy soups in a row for us to eat! Anyone who has to avoid hard and crunchy foods and stick to the soft (for whatever reason), rejoice! Your recovery can be delicious. Sadly I forgot to take any pictures until the end of the week when only the last two were left, but hopefully you can visualize the rest (they are all pureed so look similar except for color). An immersion blender is a great way to make soups creamy without having to wash a real blender.
1. Butternut Squash w/ Apple
This recipe came from Appetite for Reduction. Fortunately I had a half-bushel of gold rush apples that added some wonderful tartness and flavor to the soup. It didn't have that many calories, so we added 3/4 cup of cashews (which also added a nice creaminess as well). I've had many butternut squash soups, and a few with apples, but I think this is my favorite.
2. Black Bean w/ Avocado
This recipe from the Bold Vegetarian Chef is kind of like the best things about black bean soup, guacamole, and salsa, all rolled together. I mean, sure it would be nice to eat it with corn bread or tortilla chips or something, but it does the trick by its lonesome too when you're sticking to soft foods.
3. Creamy lentil
This one (from Garlic Garlic Garlic) comes out pretty thick, so you may want some extra water if you want it more like soup instead of stew. It seems like it should be boring, but the sherry somehow makes it different, and the chives are great too if you have them.
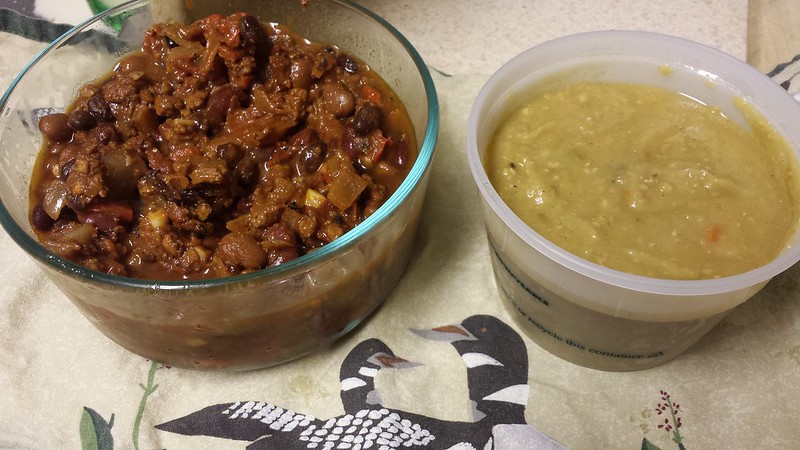
4. Split pea soup
This recipe from the Bold Vegetarian Chef works best when not pureed (it has some nice potatoes, and pieces of tempeh bacon), but it still has a nice combo of the split peas, smoky tempeh, and other veggies. This soup is nice and filling, and if you get sick of it, swirl in some Sriracha which adds a pleasant twist.
5. Chili
There was a chili cookoff competition for our neighborhood, and Sarah decided we should make a vegetarian chili to show people that you can have a great chili without meat. Sadly, I put beyond meat beefless crumbles in it, which only add a dry, rubbery, flavorless series of chunks to get in the way of an otherwise delicious chili. But otherwise it was pretty good.
Recipes for all but the first one are at http://fish.freeshell.org/recipes.html
Need something pleasant to drink, but can't have alcohol (b/c of medication, or inflammation, or whatever)? I relied heavily on homemade fake beer.
1. Butternut Squash w/ Apple
This recipe came from Appetite for Reduction. Fortunately I had a half-bushel of gold rush apples that added some wonderful tartness and flavor to the soup. It didn't have that many calories, so we added 3/4 cup of cashews (which also added a nice creaminess as well). I've had many butternut squash soups, and a few with apples, but I think this is my favorite.
2. Black Bean w/ Avocado
This recipe from the Bold Vegetarian Chef is kind of like the best things about black bean soup, guacamole, and salsa, all rolled together. I mean, sure it would be nice to eat it with corn bread or tortilla chips or something, but it does the trick by its lonesome too when you're sticking to soft foods.
3. Creamy lentil
This one (from Garlic Garlic Garlic) comes out pretty thick, so you may want some extra water if you want it more like soup instead of stew. It seems like it should be boring, but the sherry somehow makes it different, and the chives are great too if you have them.
4. Split pea soup
This recipe from the Bold Vegetarian Chef works best when not pureed (it has some nice potatoes, and pieces of tempeh bacon), but it still has a nice combo of the split peas, smoky tempeh, and other veggies. This soup is nice and filling, and if you get sick of it, swirl in some Sriracha which adds a pleasant twist.
5. Chili
There was a chili cookoff competition for our neighborhood, and Sarah decided we should make a vegetarian chili to show people that you can have a great chili without meat. Sadly, I put beyond meat beefless crumbles in it, which only add a dry, rubbery, flavorless series of chunks to get in the way of an otherwise delicious chili. But otherwise it was pretty good.
Recipes for all but the first one are at http://fish.freeshell.org/recipes.html
Need something pleasant to drink, but can't have alcohol (b/c of medication, or inflammation, or whatever)? I relied heavily on homemade fake beer.
Sunday, March 8, 2015
Vegan options at Ronald Reagan Washington National Airport (aka DCA)

UPDATE (9/11/18): I updated the listings, and also noted some nonvegan vegetarian options to help people understand the options
DCA has always had a couple of acceptable vegan options, but it's been getting a lot better over the last year and I just had to write something to list it all. Note that I'm not counting stuff like getting snacks at newsstands.
Here's an interactive map showing the exact location of each good vegan-friendly option within the airport including links to menus etc where available:
http://vegdc.com/search-results/?search_query=&address=Arlington%2C+VA+22202&radius=1&wpas=1
Before Security (you CANNOT take chili or noodle soup bowls through security, but you CAN take the vegan burger with chili, a burrito, or sushi):
- Ben's Chili Bowl: vegan chili, vegan burgers, vegan chili fries, non-vegan hot dogs
- Matsutake Sushi: veggie sushi, noodle bowls, etc.
- Qdoba: decent burritos and tacos
- Terminal C:
- &pizza for pizza with vegan cheese, vegan beef crumbles, and tons of other fancy vegan toppings.
- Others: Wow Bao has a vegan rice bowl ("all vegetable") and some non-vegan bao (stuffed buns); Five Guys has no veggie burger and non-vegan buns.
- Terminal BC:
- Taylor Gourmet whose Lehigh sandwich is a beautiful thing combining roasted cauliflower, white bean hummus, spicy red pepper sauce, and arugula.
- Lebanese Taverna has falafel sandwiches and salads, hummus, and more.
- Others: Big Bowl has a vegan tofu / veggies option, Smashburger has a non-vegan veggie burger, and Magic Pan has a couple non-vegan vegetarian crepes.
- Terminal B:
- Cava Mezze: has hummus, falafel, salads, etc. (vegan menu).
- Others: Good Stuff Eatery has a nonvegan fried green tomato burger
Saturday, February 28, 2015
Artisan Vegan Cheeses Review: Gouda, Gruyere, Emmentaler
If you are vegan and ever liked good cheese, chances are you already know about Miyoko Schinner's Artisan Vegan Cheese cookbook. It took a completely new approach to vegan cheese: using bacterial cultures to make the tangy flavors of cheese, rather than simple acids like lemon juice. They're all based on cashews or vegan yogurt or both.
Overall, her cheeses are incredible in terms of flavor, but at the cost of a soft, sort of grainy texture. Regardless, we've made enough of them now I figured it was time for a review.
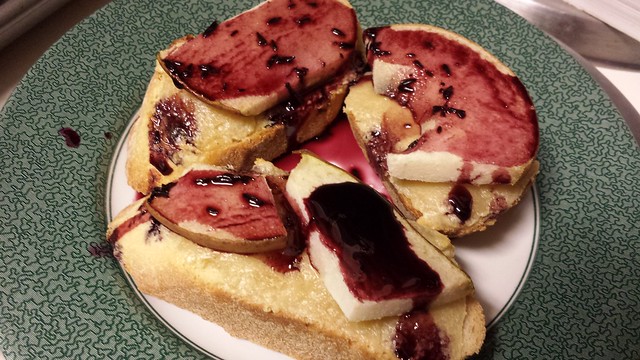
Gruyere: This is probably my favorite recipe so far. It has a rich, complex flavor, a good spreadable texture, and the ingredients are things we already have in stock (although I realize not everyone has coconut oil or deodorized cocoa butter, we have a ton we're trying to use up). It's great on crackers, and really helped out a kugel we made. The picture below is of crostini with "hard" gruyere (still pretty soft), pears, and red wine glaze (recipe is in her book), which were fantastic.
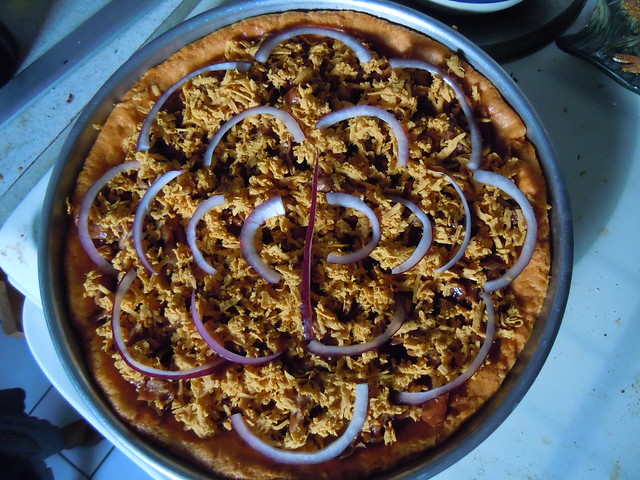
Gouda: Sadly we don't have a picture of this, but I mixed it with BBQ seitan on sandwiches, for a similar effect as this BBQ pizza I made with commercial vegan gouda one time. It is pretty similar to the hard gruyere, but requires yogurt which I'm not a fan of: Also you have to rub the rind with salt before air drying, which I had trouble with, but it still came out really well. Definitely worth eating.
Air-dried emmentaler: We had high hopes for this as Sarah loved Swiss cheese. But it just tasted sour and weird. Basically it tasted like yogurt and sauerkraut (understandably, as those are two key ingredients). We tried a few ways to use this up but in the end gave up and tossed it since it was pretty gross.
In the past we've also made the goat cheese, fresh mozzarella, and sharp cheddar (see the write up of our vegan cheese tasting party for details).
Next steps include meltable Monterey jack, getting a "nut milk bag" to strain vegan yogurt to make air-dried parmesan (!), boursin, and camembert.
I also recently made a vegan brie from a kickstarter (see below), which turned out well. It was not very Brie-flavored (it had a very mild flavor, although it was complex and pleasant) but had a great rich texture almost like cream cheese and was nice on crackers. I want to try making it again, and compare it side by side to the Miyoko Schinner brie.
Sunday, December 14, 2014
Double-Blind Taste Test Party
We decided to host a blind taste test party where we would
have a suite of arguably similar products, labeled with random numbers in a
double-blind fashion (one person assigns a random letter to each sample, a different person replaces the letter with a 3-digit random number and writes down which letter corresponds to which number to be decoded later) so that guests could taste them all and rank / judge them
without any preconceptions. An easier approach some people followed was just putting the brand on the bottom of otherwise identical containers. The results are below, and you can get the raw data here if you like.
We collected a simple rank order
for each set of samples rather than a fixed scale (e.g. 1-10), but rather than
properly normalizing and analyzing the data we just took the mean of the ranks
because of laziness. As such, this data should be used for entertainment
purposes only. In a minor concession to science we added the standard deviation
and a count of how many guests ranked each sample as the best or worst in the
raw data.
Carrots
The grocery store
organic carrots won, with conventional carrots clearly the most reviled as
bland, and organic CSA carrots in the middle due to their polarizing strong
flavor (loved or hated).
Chocolates
Only 4 people submitted data for the 9 flavors chocolates
(one of which was partial), partly because the labels got jumbled partway
through. But the rice milk chocolate
with peanut butter filling was a clear winner, and plain dark chocolate the
least preferred overall.
Cocoa Powder
Highly polarizing. The strong and complex cocoa flavor of
the Rademaker Dutched cocoa entranced some but others hatred it (but it still
nudged into #1), and the same was true of the more metallic / traditional flavor
of Hershey’s (a close #2), with the relatively bland Whole Foods cocoa in #3
(which was no one’s favorite).
Cola
These ratings were all over the place and the rankings were
close (except Malta Goya, the “wild card” which all but one person hated).
Overall Giant Cola was the winner, followed
by Mexican Coke, Pepsi, American Coke, RC Cola, and Malta Goya in last. Several
attendees requested a blind American / Mexican Coke test when it was revealed I
(Jon) successfully guessed all colas blind (except switching Giant and Pepsi), and
ranked Mexican Coke as #1 but American Coke as #2. However, no other guests
successfully guessed which was which, and I probably got lucky.
Cookies (sandwich cremes)
The surprising winner was low-fat Oreos, with Back to Nature just behind in #2 place. Normal
Oreos were a fairly distant 3rd, then Glutino (mostly b/c one person
gave it the top rank), Joe-Joes, and Newman-O’s a clear last. Note that we unscrewed the top of every cookie so that people wouldn't be able to see the brand name embossed in the cookie top.
Grilled Vegan Cheese
Daiya barely beat
out Sheese, with Follow Your Heart in 3rd, but Daiya was another
strongly polarizing one due to its strong flavor (either cheeselike or fake
depending on your point of view).
Hot Dogs
Lightlight jumbo dogs
won out, with Tofurkey dogs just behind. Whole Foods and Tofu Pups were consistently
more disliked due to their blander flavor. Tofu Pups was ranked last by all but
2 participants.
Hummus
Cava Mezze was a
clear winner with its nicely balanced flavor. Giant came in #2 despite being
generally ranked as bland since the 3# brand (Whole Foods) had a strong tahini
taste that 5 attendees really disliked.
Jelly Beans
We didn't collect data on this, but we DID have some Jelly Belly "Bean Boozled" beans, which come in pairs that are identically colored but are good or horrible. On the most benign end, everyone agreed toothpaste was pleasant enough (arguably about the same as Berry Blue), and lawn clippings were fine too. I think skunk and barf generated the most awful faces, but rotten egg was apparently pretty epic too (I didn't try that, nor canned dog food which was reputedly bad but less than rotten egg). Stinky socks and booger were bad but tolerable, moldy cheese was quite accurate which some people didn't mind and others couldn't stand, and baby wipes were scarily dead-on.
Tea
This was another surprising one. Cheap old Liptons was ranked 1, followed by the Premium Liptons,
followed by the theoretically “better” Irish tea (I forget the brand). I think
plain Liptons was less tannic (albeit less flavorful) than Premium Liptons, and
the Irish tea was clearly the most bitter. Even odder is that for both Irish
and Premium Liptons, the “standard brew” (168F water in a cold vessel and
squeezed teabags) was substantially more popular than the “British brew”
(rapidly boiling oxygenated water in a hot vessel without squeezing teabags).
While the British brew produced more flavor, and all teas were brewed for 3
minutes (not too long), it may be that drinking them without sugar or milk meant
that weaker flavors were preferred overall.
Tortilla Chips
Most people couldn’t tell the difference (or not a strong
difference), and only 2 people successfully guessed the color of each (this was inevitably a single blind experiment with one person tasting with eyes closed and another person who knows the color passing them each type of chip). But
there was a very weak preference for yellow
(the most flavorful), then blue, then white corn.
Twizzlers
We didn’t have actual Twizzlers, but Target beat out Lolli and Pops (despite costing 1/3 as much) mainly
on texture (as the latter was very tough). Several people (but not all)
preferred the Lolli and Pops flavor.
Vanilla Vegan Ice Cream
Trader Joe’s was
a clear winner with all but 2 attendees preferring it strongly to So Delicious
(described as having a more beany taste by several).
Vegan Cream Cheese (tasted with bagel segments)
Tofutti was a
clear winner, with Follow Your Heart, Go Veggie, and Daiya basically in a 3-way
tie, and the homemade cream cheese coming in last (it wasn’t bad, but was the
least like cream cheese).
Vodka
This was an upset, with Svedka
(the middle of the road price-wise) a fairly clear favorite, and Aristocrat (as
cheap as it gets) beating Russian Standard (the premium vodka) for 2nd
place. Attendees were mostly polarized around whether Aristocrat or Russian
Standard was the gross one.
Wine
A few things were interesting here. No one (except me) successfully
guessed that one of the 5 red wines was a dyed Chardonnay (although some did
describe it as minerally, sweet/sour, and oaky, and I knew one of them was a
Chardonnay). The relatively fancy Napa
Valley 2012 Yountville Cabernet Sauvignon was a clear winner, with the same
wine heavily aerated (via a milk frother and a few hours of decanting, see picture below) in the
#2 place but substantially less preferred. The Purple Moon shiraz was #3, then
the dyed Chardonnay (which I have to say was truly dreadful wine), followed by
Charles Shaw Shiraz (which was either a bad bottle, or several attendees had
convinced themselves was good despite it being crappy wine). If you want to try
dying wine, for this bottle I added 25 drops of red food dye, 2 of blue food
dye, and 10 of black food dye. It looks pretty good in a clear glass, but
brownish against a white background.
Thursday, September 25, 2014
Homemade alcohol-free relaxing "beer"
Recently Sarah went on an antibiotic that means she can't drink any alcohol for a while. She is also on a no-sugar kick, so even if it was any good (it's not) fake beer isn't ideal given the malt. It's not the end of the world, but a beer sure is nice at the end of a difficult day, so I figured it was worth trying to see if I could come up with a reasonable replacement. The goals I had were:
1. Good taste
2. As beer-tasting as possible, especially on the hop side (as Sarah likes super-hoppy IPAs)
3. Actually relaxing (not just beer-flavored)
4. Ideally looks / feels kind of like beer too (carbonated, in the yellow-orange family, bonus points for foamy head)
Here is the most recent version (iteration 3, with many more likely to come) of the "recipe" I came up with for a single "beer" (I usually make a large batch of the hops extract to reduce the work per "beer"):
1/4 cup dried whole hop flowers (I actually didn't have pure hops so I used a homemade blend of relaxing tea with hops, skullcap, chamomile, and a few other things)
Skullcap extract (I happened to have some we weren't using we got from Mom)
Club soda
1/8 tsp Truvia fake sugar OR 1.5 tsp agave nectar or barley malt syrup if not avoiding sugar
optional: Angostura bitters or orange bitters (note: these are alcoholic so I used a very small amount, see below)
I start by adding the hops / herbs to ~1 cup of water, bring it to a boil (in the microwave thus far), then remove from heat and let it steep for 15 minutes. I strain the herbs out and end up with about 3/4 cup of tea. Boil this (I put the tea in a glass measuring cup in the microwave) until it is reduced by half (halfway between 1/4 and 1/2 cup). Note that the tea gets a bit frothy as it boils so be sure to use a 2-cup measure or just closely watch it to prevent spillage. Alternatively, just boil the herbs and water in the saucepan, then strain it out for a stronger flavor. Once it is reduced, you will have an intensely bitter / hoppy flavor essence for the base of your beer. Stick it in the freezer or fridge until cool (earlier attempts used ~ 1 shot of tea so the heat wouldn't make the overall beer warm, but this is way better).
Remove the cool hoppy tea from the fridge, add ~ 1 dropper of skullcap and the Truvia and stir until it dissolves. Pour into a pint glass and add 12 oz club soda (or less, to taste). Optional: if you want more complex flavor and a darker color, add no more than 10mL orange bitters or 5mL Angostura original (Gentian) bitters. The original bitters add a nice color as shown above, and great flavor, but it is 58% alcohol so it's important to not use much. The nice frothy head goes away fairly quickly, but regardless you end up with a drink that is carbonated, hoppy and bitter (but not too bitter thanks to the Truvia), and relaxing (hops is a soporific that helps you feel sleepy, skullcap in a nervine that makes you generally relaxed).
It's not a true substitute for alcohol, but it's a pretty tasty, pleasant, and relaxing beverage, and I highly recommend it for anyone looking to avoid or minimize alcohol but who enjoys beer. If you like darker beers, here's our "stout" variant: http://veganladyeats.blogspot.com/2015/05/homeade-alcohol-free-stout-beer.html
Monday, June 16, 2014
On biking to work - part 1

As an adult, the first job I ever biked to was just two relatively flat miles from my house. I avoided biking when it rained or when it was cold, and I usually just wore my work clothes since I didn't work up too much of a sweat on the way. In any case a shower was definitely not required, which reduced the complexity of my bike commute considerably. I'd throw on my backpack to hold my wallet, lunch, and bike lock, and I was good to go.
When I started looking for a new job, I actually only looked within a 5 mile radius specifically because I didn't want to have to bike any further! Luckily, by that time my radius was pretty close to the city and I was able to find something just at the five mile mark. My new workplace had a shower - another requirement I'd had for any new job; and during D.C. summers, you really do want to shower after biking five miles.
Since my new ride was much more urban, I had to contend with cars turning suddenly in front of me, delivery trucks parked in the bike lane, cars stopping & turning without warning, and the worst fear of all - the fear of getting doored. I'd heard awful, horrible stories about this - where someone opens their car door a half a second before you get there, and with no time to react, you slam into the door full speed, possibly flipping over it, possibly getting thrown into oncoming traffic. Many things can happen - all bad. Although in some cases the cyclist can't do much of anything, it's always a good idea to check your brake pads to make sure they're good and thick. Once they get worn down they provide MUCH less stopping power. I speak from personal experience as a person who let her brakes get too worn down. It's really surprising how much quicker you can stop with new brake pads.
I started out carrying my toiletries bag, towel, work clothes and shoes in a backpack. There was a special bike cage in the parking garage, which was awesome. One major drawback was my clothes still felt damp after hanging in a locker all day. There was almost no air circulation, even though I left the locker door open. Only one piece of clothing - my towel in this case - could be slung over the door of the locker. I had a cubicle so I couldn't hang my clothes in my office.
I started getting back problems and wondered if it had something to do with carrying stuff on my back instead of in a pannier (a bag that can attach to a rear bike rack). I went ahead and invested in a rear bike rack, and some slim black Trek bags to carry my gear. The Trek bags were the cheapest bags in the store, which is why I decided on them. This decision would come back to haunt me later.
At some point during one work day, the cleaning staff of the women's locker room actually threw away my towel and my expensive REI base layer (okay, slightly less expensive because I'd bought the children's size to save money, but still!). You can replace a base layer, but that towel was the perfect size and thickness to bring to the gym. It had worn down enough that it dried really fast, but still had enough wicking power to get the job done. I was really mad, especially since now I had to close and lock the locker, and there was no chance of my gear getting even slightly dry during the day.
Various things happened, such as:
-Building management threw away my hair drier I'd left plugged in in the locker room "for legal reasons", even though I'd taped up a sign next to it that said "use at own risk" specifically so they wouldn't remove it "for legal reasons".
-One day the showers only gave out cold water. I skipped showering that day.
-Building management got a towel service for the locker rooms. It was awesome, but I'll never forget you perfect towel!
-A woman from my company's upper management showed up in the locker room out of the blue one morning. You really cannot see management naked or in any state of disrobe ever. I can't stress this enough, it's just too weird. Hide in a shower stall or bathroom stall for the next 45 minutes. You can thank me later.
-I got an office, with a door! I brought in some hangars and hung my clothes behind the door. They finally got dry during the day.
-I learned how to bike over small patches of ice. Beats small patches of sand, for sure!
-I went from being a white-knuckled, granny-paced, hyper-vigilant stress ball to actually enjoying myself.
For some reason, when you bike five miles to work, even though you have some evil hills to conquer on the way, no one will be impressed when you say "five miles". Lie, lie like a rug. Get some street cred. Just tell them how long it takes you, and that will sound better.
I'm tired, so that's about all for today. Next up - how I was betrayed by cheap panniers, the desperate cyclists' commute, winter bike commuting, and more...
Subscribe to:
Posts (Atom)